


Unlike many top music streaming services on the planet, Apple Music offers you a special feature – Family Sharing, which gives it an edge over the competition. When at least one of your family members chooses to listen to their favorite tunes on Apple Music, you might think of opting for a family account instead of separate accounts, then you could use this feature – Family Sharing.
The simple way to share subscriptions to Apple Music is to use Family Sharing. As Apple Music is tied into the entire Apple ecosystem, you could add family member to Apple Music by the method of Family Sharing, then your family member can access your purchases or collection within Apple Music on their devices. If you don’t know how to, don’t worry. Here we’re to help you, you just need to use these steps.
- Part 1. How to Add Family Members to Apple Music
- Part 2. How to Share Apple Music without Family Sharing
Part 1. Guide on How to Add Family to Apple Music
When you add family member to Apple Music, other family members can access your collection and your downloaded Apple Music songs. If you are looking for a simple, straightforward tutorial that would get you up to add family members to Apple Music, just follow a few simple steps below.
Section 1: Start a family group
One adult in the family—the family organizer—can set up Family Sharing for the group from their iPhone, iPad, iPod touch, or Mac. After you set up Family Sharing on your device, you could add family to Apple Music to start sharing. Or if you already have Family Sharing set up and are just looking to add new family members, skip to the next section.
Setting up Family Sharing on iPhone, iPad, or iPod Touch
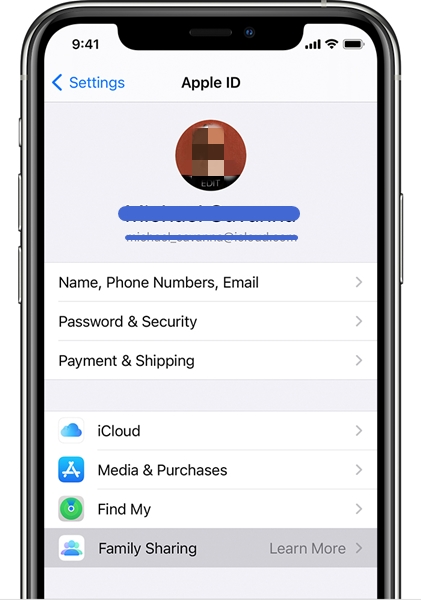
Step 1. Go to Settings and tap on [your name] at the very top.
Step 2. Tap Family Sharing, then tap Set Up Your Family.
Step 3. Follow the onscreen instructions to set up your family and invite your family members.
Setting up Family Sharing on Mac
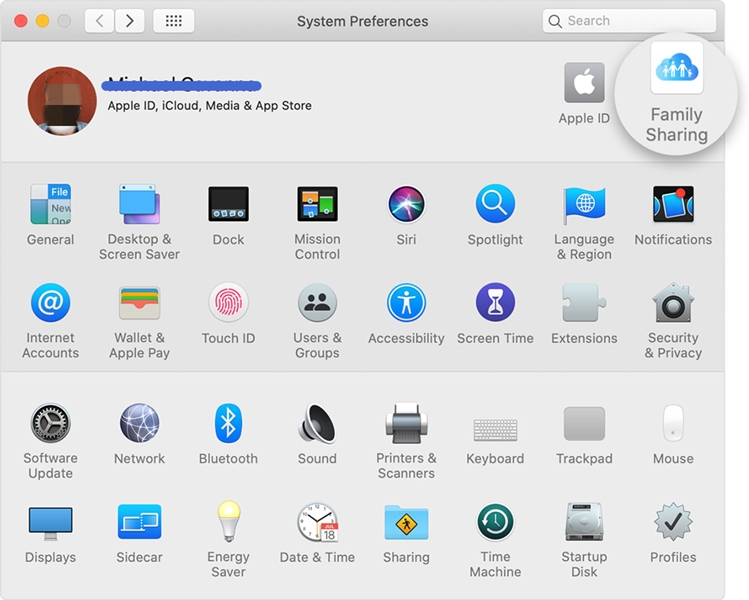
Step 1. Choose Apple menu > System Preferences, then click Family Sharing.
Step 2. Confirm the Apple ID that you want to use for Family Sharing, and make sure that Share My Purchases is selected.
Step 3. Follow the prompts displaying on your screen until setup is complete.
Section 2: Invite family members
If you have it ready, you can use the steps below to add someone to your family group. And you have to be aware that you can be a part of only one family at a time. If your family member is with you, they can enter their Apple ID password on your device to accept the invitation. Now start to send them an invitation, then they will have a chance to accept it.
Invite people to join on iPhone, iPad, or iPod Touch
Step 1. Open the Settings app and tap on [your name] at the very top.
Step 2. Tap Add Member and enter your family’s name or email address then follow the onscreen instructions.
Step 3. Now choose whether you’d like to send an invitation via Messages or to invite them in person then follow the onscreen invitations.
Invite people to join on Mac
Step 1. Click the Apple menu icon and then open System Preferences.
Step 2. Then just click on Family Sharing.
Step 3. Now click Add Family Member, then follow the onscreen instructions.
Section 3: Join a family group
All users can accept or decline an invitation to join a family directly from your device. You’ll get an invitation sent to you by email or in a text message. Then you can respond right from the invitation. If you miss the email or text invitation, no problem. You can respond from your device Settings or System Preferences.
Accept to join a family group on iPhone, iPad, or iPod Touch
Step 1. Go to Settings > [your name] > Invitations.
Step 2. To accept an invitation, follow the onscreen instructions.
Step 3. When you join a family, you might be asked to confirm your account information and to opt-in to any features or services your family sets up.
Accept to join a family group on Mac
Step 1. Choose Apple menu > System Preferences, then click Family Sharing.
Step 2. Then follow the onscreen instructions to accept an invitation.
Step 3. When you choose to accept the invitation, you might be asked to confirm your account information and then need to choose the services.
Part 2. Another Way to Share Apple Music without Family Sharing
Family Sharing makes it easy for up to six family members to share a series of subscriptions to Apple Music services like Apple Music – all without sharing each other’s Apple accounts. However, one of the most common issues is that a family member might be using multiple accounts and is either logging into Apple Music or iCloud with a different account.
So, undoubtedly, it is not easy to fix issues preventing you or a family member from accessing a Family subscription. Sometimes. logging out and back in is one method that maybe work for fixing the issue. In fact, you just want to share your Apple Music songs with your family or friends by the method of Family Sharing.
With that being said, you could try to use another method to share more effectively. If you want to share your purchased iTunes songs or downloaded Apple Music songs with people around you, just have a try at using Tunelf Audio Converter, a powerful audio converter for Apple Music users.
If you’re considering sharing your Apple Music or iTunes songs with your family, be sure to think about this program. Tunelf Audio Converter can remove DRM protection from Apple Music and convert the downloaded Apple Music songs to MP3. Then you can easily send your Apple Music songs to other people on your device.

Key Features of Tunelf Audio Converter
- Convert Apple Music to MP3, WAV, FLAC, AAC, and other audio formats
- Remove DRM from Apple Music, iTunes audios, and Audible audiobooks
- Preserve the converted audio with lossless audio quality and ID3 tags
- Support the conversion of audio format at a 30× faster speed in batch
Step 1 Select Apple Music songs you want to share
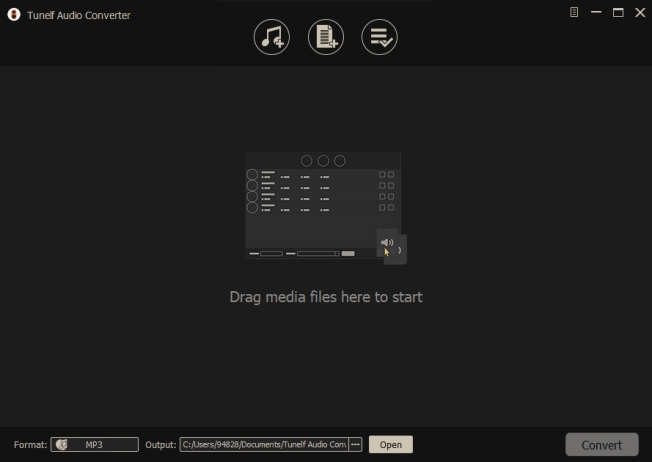
Fire up Tunelf Audible Apple Music Converter then it will automatically load the Music app on your Mac computer or iTunes on your Windows computer. Bow you need to select Apple Music songs you want to convert, and you can directly drag and drop your required songs to the interface. Or you can click the Load iTunes Library button located at the top of the program and start to browse your Apple Music songs you want to convert.
Step 2 Pick your format and adjust your audio settings
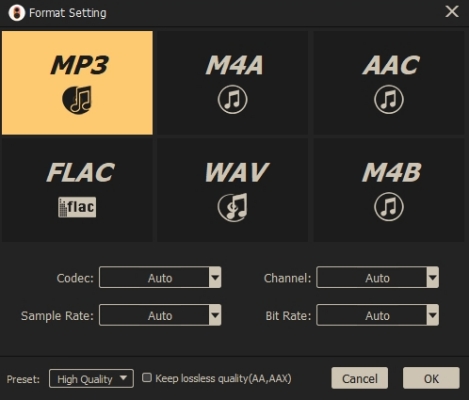
Within the converter, you could select your desired format and quality level for your Apple Music songs after all your required songs are loaded into the conversion list. The converter automatically defaults to the High-Quality level when converting files to MP3. If you tap the Format panel at the bottom left corner of the converter, you can adjust things like format, bitrate, sample rate, channels, and codec.
Step 3 Start to convert your Apple Music songs to MP3
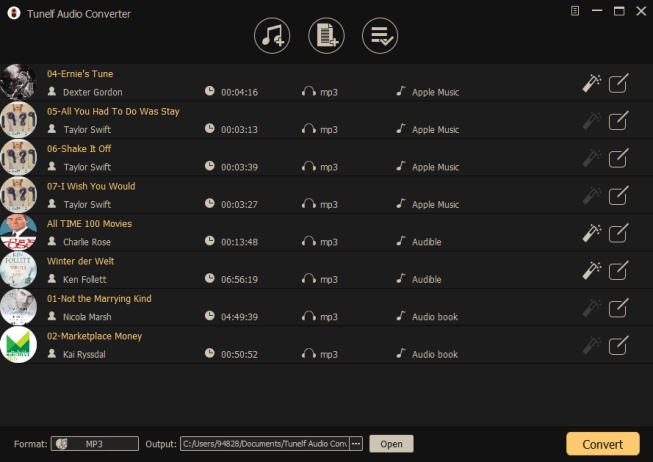
The last step is to make the converter to start the conversion of Apple Music to MP3 by clicking the Convert button at the bottom right of the main interface. Once the conversion is complete, your converted Apple Music songs have been saved to the default folder or the folder you preset before conversion. To browse all the unprotected songs, you can hit the Converted icon located at the top of the program.
Conclusion
And that’s all there is to it, and you will know how to add family members to Apple Music now. If you do want to make your Apple Music songs playable on more devices or share them easier, why don’t you try to use Tunelf Audio Converter? Then you’ll find it out and could get a surprise.