


There are many ways for us to enjoy music due to the continuous reform and revolution in streaming services. Among these platforms, Spotify is definitely one of the most popular music platforms. Thanks to Spotify’s easy compatibility, you can select the streaming devices on the fly. At home, utilizing receiver devices like Yamaha Receiver to have a wireless multi-room or whole-house listening experience cannot be better. So in this post, we’re going to tell you how to get Yamaha Receiver Spotify playing in 3 simple ways.

Way 1. Connect Spotify to Yamaha Receiver via MusicCast Controller
Yamaha MusicCast is a streaming and multi-room audio system built into many Yamaha products including the Yamaha Receiver. With the MusicCast Controller app, you can easily control all equipment and listen to streaming services like Spotify. This app also lets you customize your music, create favorites, link rooms, switch content sources, and adjust sound EQ. So, many people choose MusicCast Spotify to enjoy listening. The tutorial on how to play Spotify on Yamaha Receiver with Yamaha MusicCast is as follows:
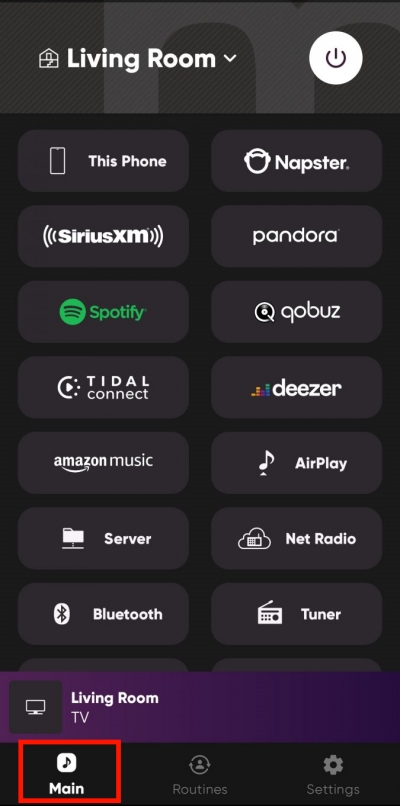
Step 1. Install MusicCast Controller from Play Store or App Store and then launch it.
Step 2. Follow the instructions within the app to set up and link your Yamaha device.
Step 3. Select a room to listen to music through your MusicCast-enabled devices and then go to the Main tab from the bottom corner.
Step 4. Scroll down to the Sources section, then select Server > Spotify and log in to your Spotify account.
Step 5. Start browsing any track, album, or playlist you want to listen to and play them through your Yamaha Receiver.
Way 2. Play Spotify on Yamaha Receiver via Spotify Connect
Since Spotify Connect was released in 2013, it has gained much popularity due to its great convenience. With Spotify Connect, you can play the Spotify catalog over WiFi to any compatible device in your home including the Yamaha Receiver. Now follow the instructions below to understand how to connect Spotify to Yamaha Receiver.
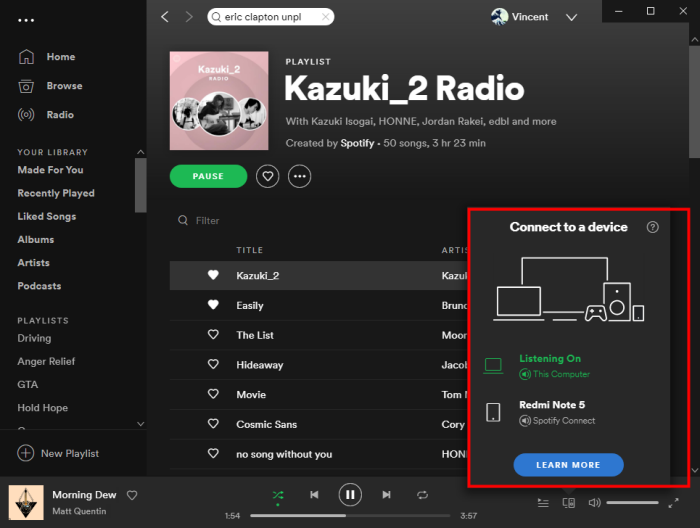
Step 1. Run the Spotify app on your phone or computer.
Step 2. Pick the song you want to play on your Yamaha Receiver.
Step 3. From the Now Playing bar at the bottom, tap the Devices icon.
Step 4. Spotify will provide all available devices in the list. You just need to select your Yamaha Receiver to set up the Spotify Yamaha Receiver connection.
Step 5. Once connected successfully, the sound from Spotify will played through your selected device.
Note
You can also play to MusicCast devices through Bluetooth or AirPlay depending on your device.
Way 3. Play Spotify on Yamaha Receiver Offline without Premium
As Spotify protects its music with a special encryption code, we can only play Spotify music via Spotify Connect or other integration. Moreover, to listen to Spotify on Yamaha Receiver, a Spotify Premium is required. Hence, we’d like to introduce the best way to get Yamaha Receiver Spotify listening, that is to use Tunelf Spotibeat Music Converter which can download Spotify music locally without Premium. In this way, we can get Spotify music downloaded and play Spotify on Yamaha Receiver or any other device.
Tunelf Spotibeat Music Converter is a powerful downloading and converting tool. With Tunelf software, you can download and convert Spotify to MP3, FLAC, AAC, WAV, M4A, and M4B. That is, you can keep Spotify music tracks playable offline forever without DRM protection. All you need to do now is to download and install Tunelf software to start the conversion. The tutorial is as follows. You don’t need to worry about quality loss as it even offers higher quality settings than Spotify.

Key Features of Tunelf Spotify Music Converter
- Download Spotify playlists, songs, and albums with free accounts easily
- Convert Spotify music to MP3, WAV, FLAC, and other audio formats
- Keep Spotify music tracks with lossless audio quality and ID3 tags
- Remove ads and DRM protection from Spotify music at a 5× faster speed
Step 1 Add Spotify music to Tunelf
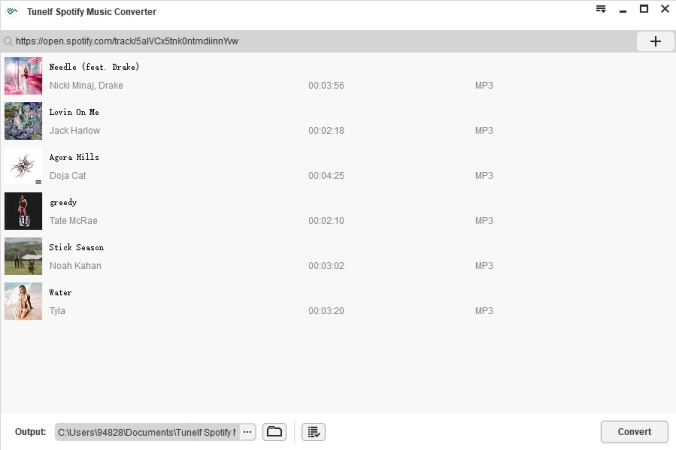
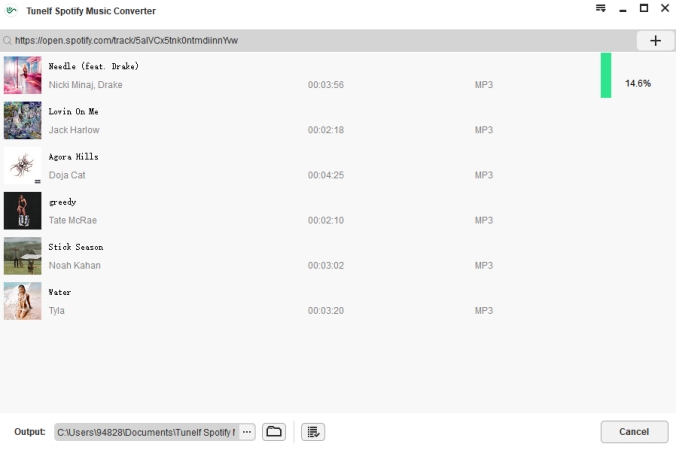
Before converting, please make sure you have both Tunelf and Spotify on your device. When you launch Tunelf, the Spotify app will work at the same time. You can browse your target song in the Spotify music library and copy the song by clicking Share > Copy Link and paste it to the search bar to add Music files to the program. Or you can simply drag and drop to load the files. Once you load the files, you can check them on the Tunelf main screen. You can add a batch of music to convert at a time.
Step 2 Set the output formats
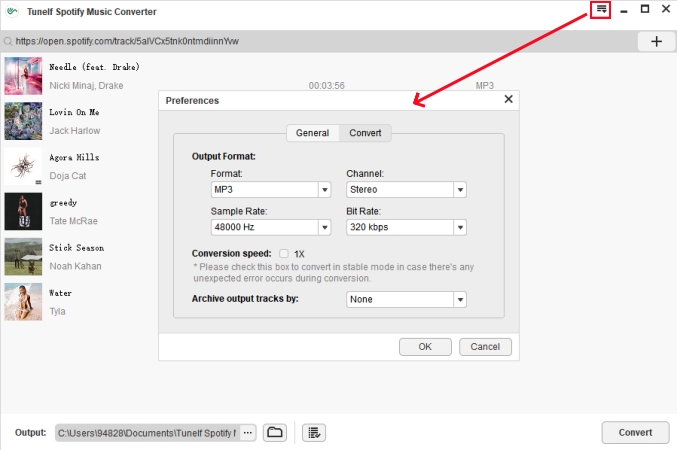
Now you can select the output format and customize the archives by clicking the three-line menu on the top right of the interface. After clicking, a window will pop up, then go to Preference > Convert. Here you can change the sample rate, bit rate, channel, and archive according to your needs. To play Spotify on Yamaha Receiver, keeping the default MP3 format will be suffice. You can also set your preferred output location, just hit on the three dots next to the Output panel.
Step 3 Start downloading Spotify locally
Once you’ve set the output formats and customized the output archives, click the Convert button to start the conversion. The conversion will be done within a few minutes. After that, you can locate the converted files in your local drive by clicking the search icon in the Converted list.
Step 4 Play Spotify on Yamaha Receiver Offline

- Prepare a USB drive and plug it into your computer for moving all playable Spotify songs.
- Then insert the USB drive into the Yamaha Receiver’s USB port.
- Press the USB button on the remote control to select it as the input source.
- Use the buttons on the unit or the remote control to navigate and choose what you would like to play.
Alternatively, you can transfer the music to your mobile phone. Then connect your phone to a Yamaha Receiver with Bluetooth or Airplay to start playing.
Troubleshooting: Fix Yamaha MusicCast Spotify Not Working
Either you choose MusicCast Controller or Spotify Connect to get Spotify on Yamaha Receiver, sometimes, Spotify won’t connect to Yamaha Receiver. This is why we recommend Tunelf Spotibeat Music Converter this offline way. If you are facing the Yamaha MusicCast Spotify not working issue, no worries, this part will reassure you.
1. Ensure Spotify plays. According to a user who solved this issue: when the Yamaha AV receiver running with scene Spotify selected. Simply pressed ‘play’ on the remote and it immediately started to play some recently selected songs from Spotify. That shows Spotify connects Yamaha Receiver for playing.
2. Change DNS servers in Yamaha Receiver. This can be done by simply accessing the AV receiver’s web-based configuration in the browser via its IP address.
3. Restart the router. Completely unplug your Yamaha device and plug it back in to fix Yamaha MusicCast Spotify not working temporarily.
4. Check Yamaha Spotify Connect firmware updates. Please make sure that the firmware of your used devices is installed. Also, you need to have a Spotify paid subscription to use the Spotify Connect function on Yamaha devices.
5. Change the way to play Spotify on Yamaha. If you faced this issue using Spotify Connect, why not try the MusicCast Controller app to get your listening? Or use the USB drive containing all your Spotify music files to start offline listening. This is also the best way to bypass all issues Spotify and Yamaha’s wrong settings bring.
6. Reset Yamaha Receiver. Reset Yamaha Receiver to factory settings will get all your data back to its original status. Sometimes it works to solve issues, but it is not highly recommended to take the risks. Press the Power button. You will see ADVANCED SETUP on the display. Then select INIT-CANCEL > INIT-ALL.
Summary
In the above discussion, we’ve concluded the methods about how to get Spotify Yamaha Receiver playing and each of the methods is clearly specified. To remove Yamaha Music Spotify issues or play Spotify on Yamaha Receiver without Premium, you’d better take Tunelf Spotibeat Music Converter into consideration. We hope this post will be helpful for you. If you have any suggestions or advice, please share them below.
Get the product now:
Get the product now: