


Apple Music is a household name in the music industry, with a vast music library and exclusive playlists that are curated carefully. You can stream almost any song or playlist on your device as required. Based on the subscription, Apple Music provides great music enjoyment to you. But there exist limits on offline use. You can only download the protected music files that can only be played within Apple Music. What makes it worse is that once your subscription expires, you will lose accessibility to the music you like.
As a result, backing up your music library on Apple Music is a good choice. If you have no clue about how to do it, this post is exactly what you need. You can learn 4 feasible methods to back up Apple Music and the complete tutorial will lead you step by step. Just scroll down to learn how to.

Method 1. Back up Apple Music via iCloud
iCloud is an Apple service that keeps your data securely stored in the cloud. Its iCloud Music Library feature allows you to access the music you like on your devices. As long as you turn on the sync button, your music library will be automatically synced to iCloud.
• On iPhone/iPad
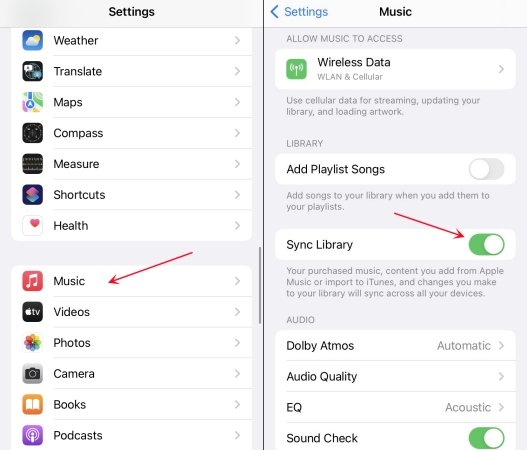
Step 1. Go to Settings on your iPhone or iPad.
Step 2. Scroll down and you can see Music. Tap it.
Step 3. Make sure that you already turned on the Sync Library button.
• On Windows
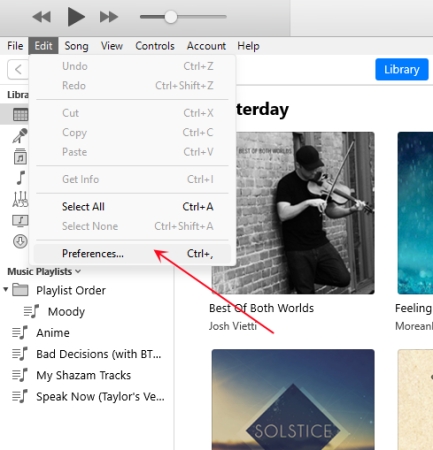
Step 1. Open the iTunes app on your computer.
Step 2. Click Edit at the top left bar. Then choose Preferences.
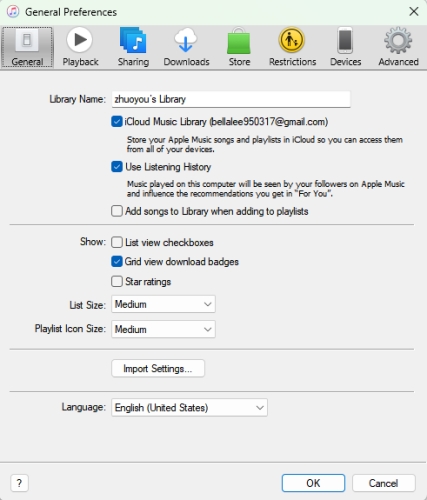
Step 3. Go to the General section on the General Preferences window.
Step 4. Click to open the iCloud Music Library box. Then click OK to make a confirmation.
• On Mac
Step 1. Fire up your Mac computer, then click the Apple Music app on the desktop to open it.
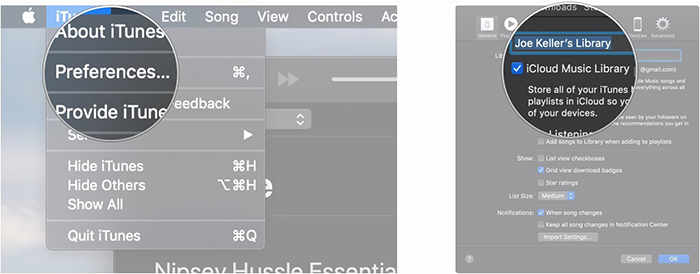
Step 2. At the upper left corner, hit iTunes – Preferences.
Step 3. Then you will be navigated to the General tab. Enable iCloud Music Library and save the setting by hitting OK.
Method 2. Back up Apple Music to External Hard Drive
If your iTunes library contains all your Apple Music files, you can transfer them to an external hard drive to back up. This method can store your music safely, in case anything goes wrong with Apple Music. Follow the steps below to reach it on your computer.
Step 1. Open iTunes on your Windows/Mac computer.
Step 2. At the top menu bar, select File – Library – Organize Library.
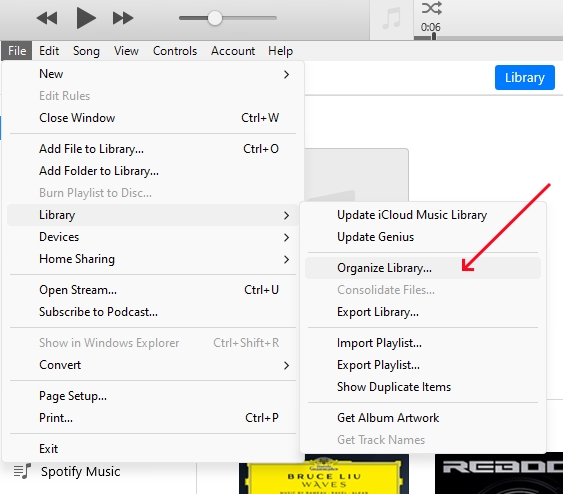
Step 3. Choose Consolidate files, and then hit OK. So, copies of all files will be added to the iTunes folder.

Step 4. To find the media folders, you should open iTunes Edit – Preferences – Advanced. Then, you can see the concrete location in the box under the iTunes Media folder location.
Step 5. Close the iTunes app and find the iTunes folder. Directly drag and drop it to your external hard drive.
Method 3. Back up Apple Music by Exporting Playlists
There is another method you can back up your Apple Music library by using iTunes. That is to save a copy file of your playlists in iTunes. It requires you to export iTunes playlists on your computer.
• Export as XML files to use on another device
In the iTunes app on your PC:
Step 1. Choose one playlist you want to back up in the left sidebar.
Step 2. Click File – Library – Export Playlist. (If you want to save a copy of the whole library, choose Export Library.)

Step 3. Choose the file format as XML from the pop-up window. Thus, the playlist you chose will be exported and saved in XML format.

Step 4. Next time, when you want to listen to the playlist, you can import the XML file into the iTunes app on another device. Just click File – Library – Import Playlist.
Note: The unavailable items in this file will not be imported.
• Export as Text files to transfer information
Step 1. Open iTunes on your PC and select the playlist you want to back up.
Step 2. Choose File – Library – Export Playlist and select Text files under Save as type section.
Step 3. Now you can copy the information you need and paste it into another application to access again.
Method 4. Back up Apple Music via Downloader
Although the above 3 methods are feasible to back up the content you want in Apple Music, the best way to back up is download Apple Music songs and remove the DRM encryption so that you can achieve full control over the music files. To do so, you need the help of a professional Apple Music downloader – Tunelf Audio Converter.
This program is a comprehensive music downloader and converter. You can utilize it to download songs, playlists, and albums from Apple Music and save the music as unprotected files. Therefore, you can keep the music even after your subscription expires. What’s more, it allows you to convert Apple Music to MP3, WAV, or FLAC with just one click. After conversion, you can keep the music files free forever. This program also thoughtfully offers you a nice 30x faster speed to save your time.

Key Features of Tunelf Audio Converter
- Convert Apple Music to MP3, WAV, FLAC, AAC, and other audio formats
- Remove DRM from Apple Music, iTunes audios, and Audible audiobooks
- Preserve the converted audio with lossless audio quality and ID3 tags
- Support the conversion of audio format at a 30× faster speed in batch
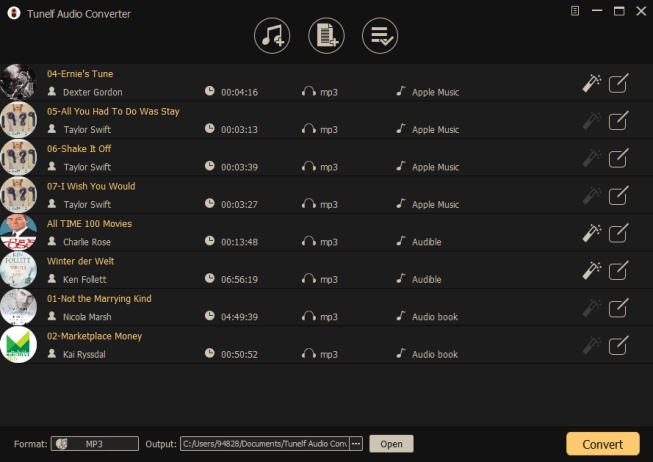
Step 1 Choose Apple Music songs to back up
Install and launch Tunelf Audio Converter, then it will help you to open the Apple Music or iTunes app simultaneously. Go to the program and click the Load iTunes Library button so you can browse the songs and playlists in your Apple Music library. Select the song you want to back up and click the Add button. If you want to choose multiple songs at once, you can press the Ctrl button and then use the cursor to select.
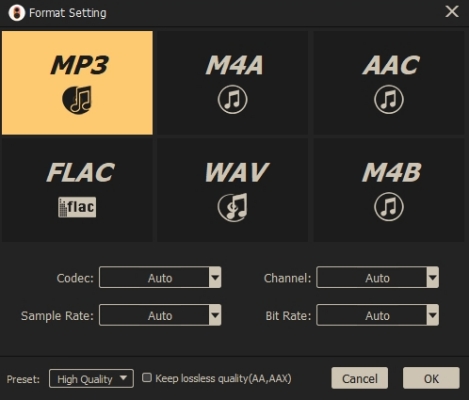
Step 2 Reset the output settings
Click the Format button at the lower left corner so as to open the output settings window. Here you can configure the output settings depending on your own demands. You can choose one suitable output format and reset the channel, bit rate, and sample rate. After that, confirm the change by hitting OK.
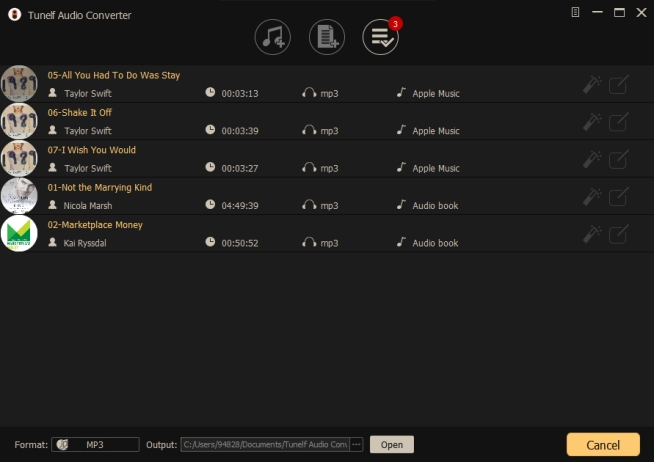
Step 3 Download Apple Music songs as backups
Once you finish all the preparations, it’s time to start the downloading and conversion process. You just need to click the Convert button and wait for a while. When it is finished, you can click the Converted icon to browse the converting history. If you want to find the location of the converted files on your PC, you can make use of the search icon next to each track.
Conclusion
Congratulations! Now, you have learned 4 workable methods to back up Apple Music after reading this post. If you want to keep your Apple Music songs, you can utilize iCloud or iTunes features. To reach it, the detailed tutorial is listed above for you to take as a reference. For perpetual keeping, the professional program – Tunelf Audio Converter can do you a favor. With its power function, you are able to save Apple Music songs as local files and use them freely.
Get the product now:
Get the product now: