


iCloud Music Library is a great feature to sync and share all your music tracks from Apple Music to all your devices. To use this feature, you must subscribe to Apple Music or iTunes Match. However, some unexpected errors may occur when you enable this feature. For instance, songs are synced with mismatched album artwork, tracks show wrong metadata, or songs refuse to sync. Thus, some users prefer to turn off iCloud Music Library to keep their music away from streaming servers to avoid such issues.
In this article, we’ll show you what iCloud Music Library is, how to disable iCloud Music Library on multiple devices, and how to back up Apple Music Library without iCloud. Read on this passage to explore more.

Part 1. What Is iCloud Music Library?
iCloud Music Library is a nifty feature included with your Apple Music subscription, which allows you to store your entire Apple Music library on iCloud. This means all your Apple Music songs, playlists, and albums stay in sync across all your Apple devices. So you can access your Apple Music Library from any of your Apple devices, as long as you signed into the same Apple ID.
But every coin has its two sides, this handy feature has its downsides too. For example, the sync process can lead to incorrect or missing song metadata and incorrect song matching. Although iCloud Music Library is a wonderful feature for most Apple users, it is not suitable for everyone. This is why we want to show you how to turn off iCloud Music Library. Let’s move on to the next part to see how to disable it.
Part 2. How to Disable iCloud Music Library on Multiple Devices
In this part, we’ll teach you how to turn off iCloud Music Library on different devices without losing your precious Apple Music collection. Before you turn off the iCloud Music Library, I strongly recommend you back up your Apple Music library. Now, let’s start it.
2.1 Turn off iCloud Music Library on iPhone/iPad/iPod
Step 1. Open the Settings app on your device, and scroll down to select Music.
Step 2. Toggle off the Sync Library switch under the Library section.
Step 3. Select Turn Off to confirm your operation.

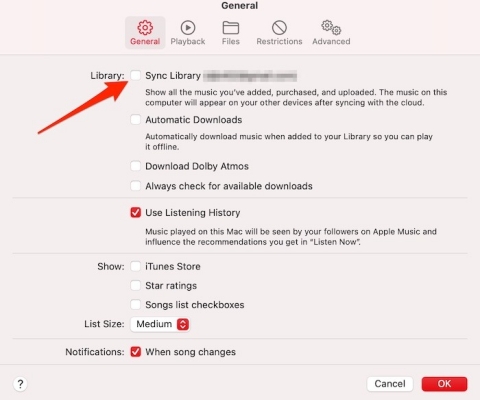
2.2 Turn Off iCloud Music Library on Mac
Step 1. Launch Apple Music on your Mac and sign in with your Apple ID.
Step 2. Click Music and select Settings.
Step 3. In the General section, uncheck the Sync Library.
Step 4. Click OK to save your settings.
2.3 Turn Off iCloud Music Library on PC
Step 1. Open iTunes on your Windows PC and sign into your Apple ID.
Step 2. Click Edit and select Preferences.
Step 3. Uncheck the iCloud Music Library box to disable the feature.
Step 4. Click OK to save your changes.

Part 3. How to Back up Apple Music Library without iCloud
Apple Music provides you with great music enjoyment, but there exist limits on offline listening. Once you turn off the iCloud Music Library feature, you won’t be able to access all your Apple Music downloads, let alone play them offline. If you still want to listen to your downloaded Apple Music songs offline on your devices after you turn off iCloud Music Library, you have to back up the music in advance. Except for iCloud, there is another way to back up your Apple Music Library forever. That is using Tunelf Audio Converter to convert and download Apple Music songs to MP3s.
Tunelf Audio Converter is a splendid Apple Music converter among all the converters in the market. This tool can help you easily back up your Apple Music and iTunes audio. It specializes in converting your downloaded Apple Music songs, playlists, and albums to MP3, AAC, FLAC, and other open formats. This tool supports converting music with 30X faster speed and keeps lossless audio quality. In Tunelf, you can also adjust the parameters of the output audio, such as bit rate, sample rate, and channel. Let’s see how to use this practical tool.
Key Features of Tunelf Audio Converter
- Convert Apple Music to MP3, WAV, FLAC, AAC, and other audio formats
- Remove DRM from Apple Music, iTunes audios, and Audible audiobooks
- Preserve the converted audio with lossless audio quality and ID3 tags
- Support the conversion of audio format at a 30× faster speed in batch
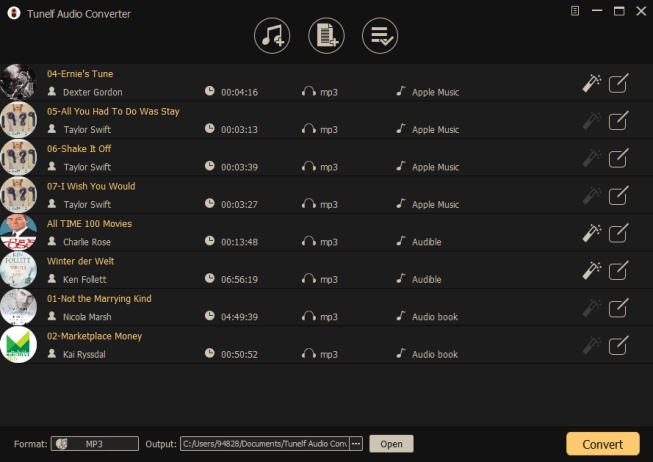
Step 1 Import Your Apple Music Audio to Tunelf
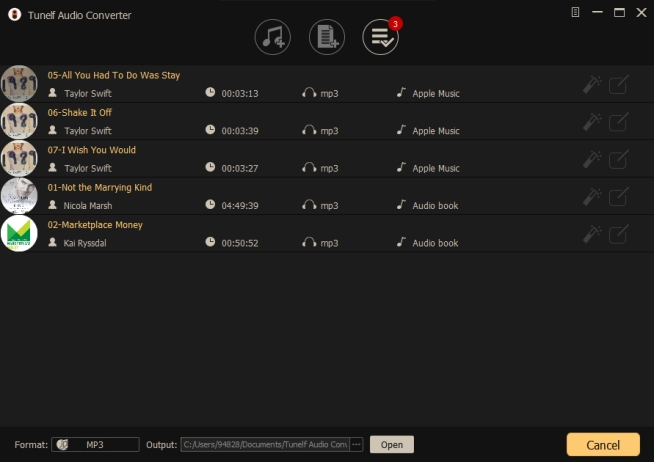
Firstly, launch the Tunelf Audio Converter on your computer. Then click on the first icon of Load iTunes Library on the top of the screen. Then your downloaded Apple Music songs will be displayed in Tunelf. Choose the target songs you want to convert and download and tap the Add button to add them to the conversion list. Or you can directly drag the downloaded songs from Apple Music to drop them to Tunelf.
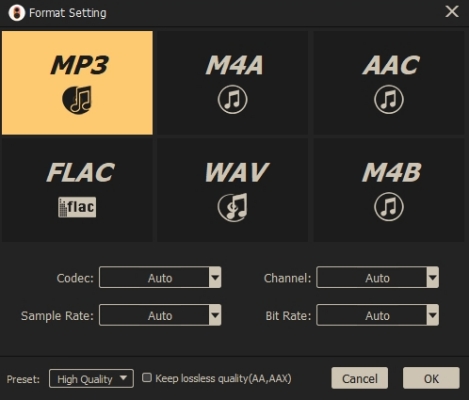
Step 2 Set Output Audio Format for Apple Music
Once your Apple Music songs are added, move on to the Format section on the bottom left, and choose the output format as MP3. In this section, you can also set the output parameters such as sample rate, channel, and bit rate. What’s more, you can click the Edit icon to change the songs’ ID3 information, including title, album, genre, etc. Then click OK to save all the settings.
Step 3 Start Backing up Apple Music to MP3
Click the Convert button at the bottom right to start converting Apple Music songs to MP3. Within a few seconds, all your songs will be converted to MP3 format as local files. After that, just click the Converted button to view all well-converted songs. Now the Apple Music songs are saved on your computer and you can play them offline.
Part 4. FAQs about iCloud Music Library
If you have any other questions about iCloud Music Library, you can check the following content. Here we list some of the most frequently asked questions about iCloud Music Library.
Does iCloud Music Library take up storage?
A: Nope. With an Apple Music or iTunes Match subscription, you can store up to 100,000 songs. It doesn’t take up your iCloud storage.
How to download music from iCloud Library?
A: Open iTunes on your PC or Apple Music on your Mac. Click on Library, and then click the iCloud Download button next to the song.
How to delete music from iCloud Library?
A: Open iTunes on your PC or Apple Music on your Mac. Click on Library. Then select a song to delete and click the three dots button. Click Delete Song to remove the song from both your computer and iCloud.
How to share iCloud Music Library with my family?
A: The best way is to convert and download your Apple Music Library to MP3, and then you can share your iCloud Music Library with your family or friends at ease. To do this, you can use Tunelf Audio Converter to convert your Apple Music songs to MP3.
Conclusion
Do you know how to disable iCloud Music Library now? Before you start turning off this feature, you have to know what it may cause and how to avoid it. As I mentioned in this passage, you’d better back up your Apple Music Library in advance to avoid losing your music data. So you need a third-party tool like Tunelf Audio Converter to ensure you keep your Apple Music Library forever.
Get the product now:
Get the product now: