

Tesla is a famous electronic automaker, which is gaining popularity due to its new energy cars. Built in 2003, Tesla is expanding its company and bringing many products to us, such as Model S, Model X, Model 3, and Model Y. It’s common to have something for entertainment when we’re driving. And many people with Tesla Model 3 don’t find a way to play Apple Music on their cars, maybe so do you. Well, don’t worry. In this post, we’ll show you how to play Apple Music on Tesla Model 3.
Part 1. Can You Play Apple Music in a Tesla?
The Tesla Media Player provides multiple streaming services, such as Spotify and Tidal. If you’re a Spotify or Tidal user, you can stream Spotify and Tidal music on Tesla with ease. However, it doesn’t offer Apple Music integration though a lot of people are looking forward to their cooperation.
“Why can’t I play Apple Music on my Tesla?” Firstly, let me answer this question for you. Apple Music runs on iOS or Android system, while Tesla has its own operating system. Unfortunately, these two software systems are incompatible, which means Tesla doesn’t support Apple Music. This lack of integration between Apple Music and Tesla frustrated many Tesla owners, as they cannot access their favorite songs while driving. Don’t worry, we are here to help you. Please move on to the next parts to get your methods to play Apple Music on Tesla.
Part 2. How to Get Apple Music on Tesla via Apple Music App
Before we start, you need to make sure that your Tesla operation system has been updated to 2022.44.25 or above so that you can get the Apple Music software on it. Additionally, an Apple Music Premium account is needed if you want to stream Apple Music on your Tesla. Now, you can follow the steps below to get Apple Music on your Tesla.
Step 1 On the Tesla touchscreen, tap the Apple Music icon in the Application Launcher.
Step 2 A QR code will appear on your Tesla screen.
Step 3 Scan the code with your phone camera and tap the displayed link on your phone.
Step 4 An Access Request will pop up, tap Allow to enable Tesla to access your Apple Music account.
Step 5 Enter your Apple ID and password, and enter the verification code to the Two-Factor Authentication page.

Part 3. How to Connect Apple Music to Tesla via Bluetooth
If you find that you still cannot get Apple Music on Tesla after you try the method above, the following three alternative methods are also available for you to get Apple Music on Tesla. But pay attention, all these three methods require a Bluetooth connection.
3.1 Use Apple Music on Tesla via Bluetooth
Well, there is a simple way that can help you to stream Apple Music on Tesla Media Player – using Bluetooth. Thanks to the Bluetooth function, we can connect our phone to a Tesla Media Player to play music. Now, you can follow the instructions below.
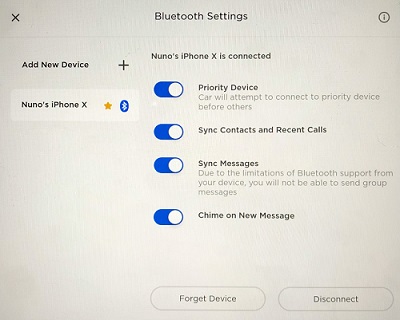
Step 1 Tap the Bluetooth icon on your car’s touchscreen.
Step 2 Toggle the Bluetooth on and keep your phone available.
Step 3 On your car’s touchscreen, tap Add New Device > Start Search.
Step 4 Select your phone in the available device list to connect.
Step 5 Open the Apple Music app and choose the song you want to play.
Now you can enjoy Apple Music on Tesla. This way is easy but you need a phone to play. Well, you may ask, can I download Apple Music and play on other devices offline forever? Luckily, you can! We’ve offered the best way for you in the next part.
3.2 Use Apple Music on Tesla via Apple CarPlay
CarPlay is a safer and smarter function to use your iPhone while driving. It allows drivers to stay focused on the road. To use this function to play Apple Music on your Tesla, make sure your iOS device system is iOS 13 or above.
Step 1 Press and hold the voice command button on the steering wheel of your car, and make sure that your stereo is in Bluetooth mode.
Step 2 Open the Settings app on your iPhone, and tap on WLAN to make sure that WiFi has turned on.
Step 3 Tap the CarPlay network on your car to make sure that the Auto-Join is turned on.
Step 4 Then, go back to your iPhone, tap Settings > General > CarPlay, and select your Tesla car.
Step 5 Open Apple Music on your iPhone and play a song, you can enjoy Apple Music on Tesla now.
3.3 Use Apple Music on Tesla via Android Auto
To play Apple Music on Tesla via Android Auto, the first thing you have to do is pair your phone with your car. Let’s start it!
Step 1 Navigate to Settings > Bluetooth on your phone to make sure you have turned the Bluetooth on.
Step 2 Press and hold the voice command button on your steering wheel to open the menu to pair a new phone.
Step 3 Follow the on-screen instructions to pair your phone with your Tesla car through Bluetooth.
Step 4 Once your phone is paired with your car, Android Auto will start in a few seconds. After that, you can stream Apple Music on Tesla via Android Auto.
Part 4. How to Play Apple Music on Tesla via USB Drive
Playing Apple Music on Tesla via the Apple Music app or Bluetooth is practical and effective, but sometimes it does have some limitations, and it won’t work well every time. All these methods need to use the phone, which is a little bit inconvenient. Is there any other easier way to play Apple Music on Tesla? Sure, here is the way.
How to Convert Apple Music for Tesla
Now I’d like to recommend the best way to stream Apple Music on Tesla. We can use a USB driver to upload Apple Music songs on Tesla and stream them on your car. But the first thing we should do is remove the DRM protection of Apple Music tracks so that they can be downloaded to the USB driver. Then whatever the limitations or problems, you can still enjoy your converted Apple Music songs offline forever.
To download Apple Music as local files, you must install Tunelf Audio Converter first. Tunelf Audio Converter is a professional and efficient software. With Tunelf, you can remove DRM from Apple Music easily and convert Apple Music, iTunes music, and Audible audiobooks to MP3, M4A, AAC, FLAC, WAV, and M4B formats. It will keep 100% original sound with super fast conversion speed. And the ID3 information of songs will be preserved well. After conversion, you can listen to Apple Music on Tesla or other devices at any time. The tutorials are as follows.
Key Features of Tunelf Audio Converter
- Convert Apple Music to MP3, WAV, FLAC, AAC, and other audio formats
- Remove DRM from Apple Music, iTunes audios, and Audible audiobooks
- Preserve the converted audio with lossless audio quality and ID3 tags
- Support the conversion of audio format at a 30× faster speed in batch
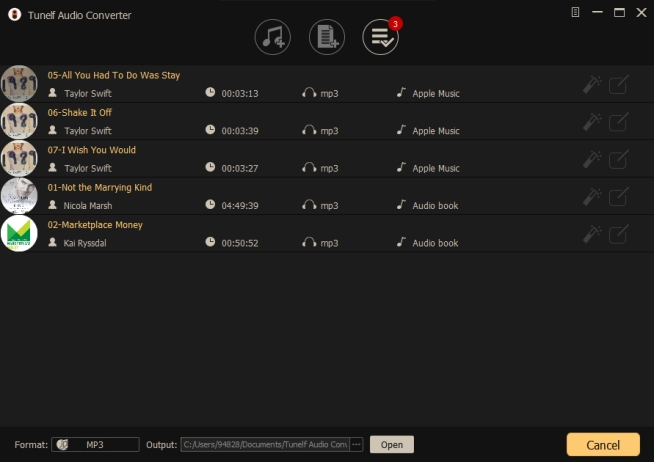
Step 1 Import Apple Music Playlists to Tunelf
First, you need to purchase and get registered for our product. Tunelf software will work with the iTunes app, so please install both of the apps in advance. When you launch the Tunelf, it will run the iTunes app automatically. You can browse your music library and select songs by clicking the Add icon on the top interface. You can also drag and drop to load playlists or songs.
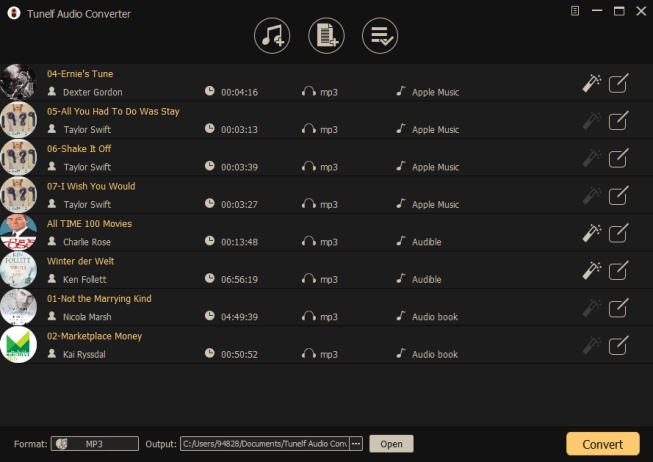
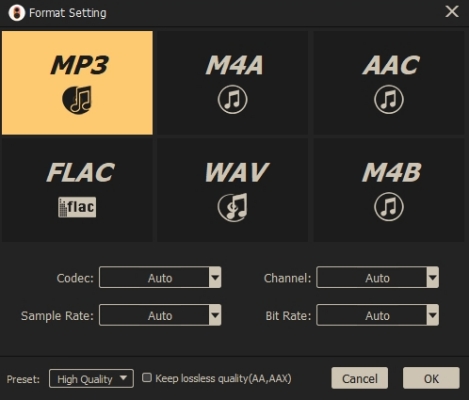
Step 2 Select output formats
After loading music tracks, you can select output formats to MP3, M4A, WAV, FLAC, M4B, and AAC according to your needs. We suggest you convert Apple Music to MP3 due to its powerful compatibility. The Format button is at the bottom of the main screen. If you’re likely to manage your music library, you can set the output storage folder and customize archives. Just click the menu icon > Preferences > Convert to do that. The conversion will be done in a very short time due to its fast 30× conversion speed. Tunelf software offers small size and high quality as well as lossless quality for you to choose from, you can click the Format button to set up.
Step 3 Convert Apple Music to MP3
Once you’ve set all of the parameters, click the Convert button to proceed. Tunelf software will start the conversion at once. When finished, you can check your music tracks by clicking the Converted icon.
How to Play Apple Music on Tesla via USB Drive
Now we have converted Apple Music tracks to our local folders, you need to transfer them to Tesla with a USB flash drive. Plug the USB drive into your computer, and copy and paste the music files to a folder on the USB. Then connect this USB drive to the Tesla Media Player. The procedures are as follows.
Step 1 Insert a USB flash drive into the front USB port of your Tesla.
Step 2 Tap Media Player > USB.
Step 3 Choose the folder of your converted songs under your USB.
Step 4 Tap a song and play. Now you can enjoy your converted music tracks on Tesla offline forever.
Part 5. Troubleshooting: Tesla Apple Music Not Working
The reasons that result in Apple Music not working on Tesla may be various and complicated. To cope with such playback issues, you can take the following solutions as a reference. If none of these solutions work, please contact Apple Music or Tesla Support for help.
1. Check your internet and Bluetooth connection.
2. Hole the two scroll wells to restart the Tesla touchscreen.
3. Log out and in the Apple Music app.
4. Update your Apple Music app and your Tesla system.
5. Disable the Low Power Mode on your phone.
6. Check if your Apple Music Premium subscription has expired.
7. Check Audio Settings both on your phone and car.
8. Uninstall and reinstall the Apple Music app.
Part 6. Conclusion
Unlike other types of cars, Tesla doesn’t support Apple Music in its cars. However, we can utilize the Bluetooth function to connect our phone to the Tesla Model 3 so that we can stream Apple Music songs. If you don’t want to use your phone, then try using a USB driver to help you. Thus, we need the Tunelf Audio Converter to convert Apple Music to MP3 and upload it to the USB driver. After conversion, you can keep the converted music files as offline playback and play them on Tesla or other compatible devices forever. That’s so efficient. I hope you can get ideas from this post. If you have other tips for playing Apple Music on Tesla, please feel free to leave your comments below.
Get the product now:
Get the product now: