


As a beloved music streaming service, Apple Music is becoming more and more popular among young people. Apple Music possesses over 100 million tracks, which allows you to get unlimited access to the world-class music catalog with the highest audio quality. If you subscribe to Apple Music, you can download songs in your Apple Music library to listen to them offline. The customized playlists make you want to save as many songs and playlists as possible. Sometimes, the added songs take up too much storage space, which means you can’t add new songs to your library. To avoid such cases, you need to delete songs from the Apple Music library from time to time.
Deleting songs one by one is a time-consuming method. So we can choose to delete all songs from Apple Music at once. How to remove all songs from the Apple Music library? Take a few minutes to read this post and get your answer.

Part 1. How to Delete All Songs from Apple Music
In this part, we’ll teach you how to delete all songs from Apple Music on multiple devices. By doing this, you can get more storage to add new songs to your Apple Music library and speed up your device.
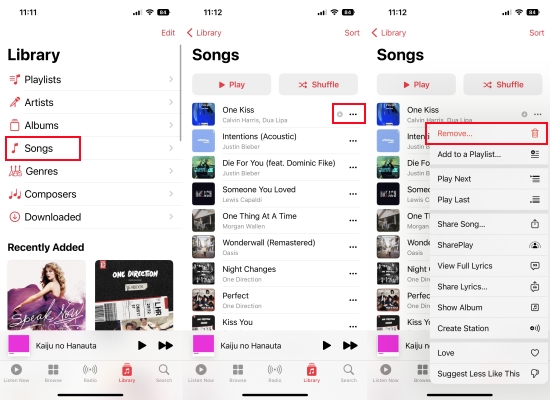
For iOS/Android:
Step 1. Open Apple Music on your phone.
Step 2. Head to the Library section.
Step 3. Tap on Songs and select the specific songs you want to remove.
Step 4. Tap the three dots icon next to the name of the song.
Step 5. For iPhone, choose Remove. For Android, choose Delete from Library. Then, your selected songs will be removed from your library.
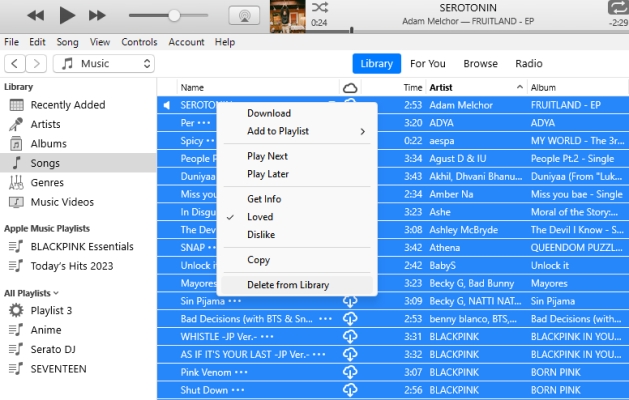
For Windows/Mac:
Step 1. Open iTunes on your Windows or Apple Music on your Mac.
Step 2. Navigate to the Library section.
Step 3. Click on Songs and use the keyboard shortcuts Ctrl + A on Windows or Command + A on Mac to select all songs.
Step 4. Right-click and choose the Delete from Library option.
Part 2. How to Remove All Downloaded Songs from Apple Music
If you want to have more space on your device, you may need to remove your downloads from your Apple Music library or your device directly. You can make room for fresh content and reorganize your offline music library by deleting the downloaded songs you don’t hear often. Let’s see how to do it.
For iOS:
Step 1. Open the Settings app on your iPhone.
Step 2. Scroll down to find Music and tap on it.
Step 3. Then scroll down to choose Downloaded Music.
Step 4. Tap the Edit icon in the upper right corner.
Step 5. Tap the red icon next to All Songs and select Delete.

For Android:
Step 1. Open the Apple Music app on your device.
Step 2. Go to the Library section and choose Downloaded.
Step 3. Tap on Songs, and select the songs you want to remove.
Step 4. Tap the three dots icon next to the name of the song.
Step 5. Tap on Remove and choose Remove Download.

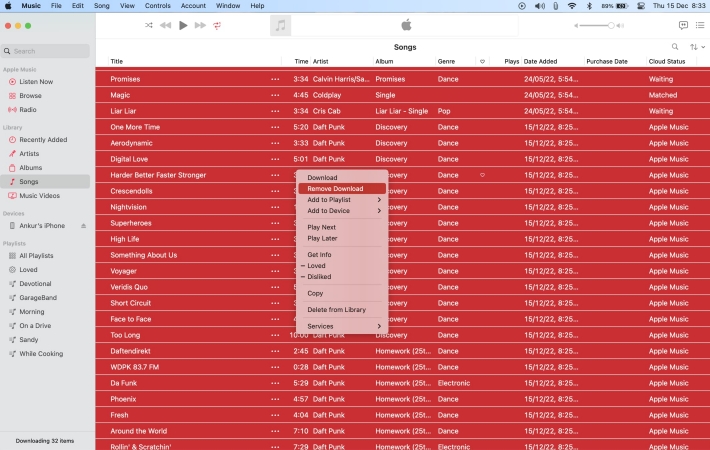
For Windows/Mac:
Step 1. Open iTunes on your Windows or Apple Music on your Mac.
Step 2. Navigate to the Library section.
Step 3. Click on Songs and use the keyboard shortcuts Ctrl + A on Windows or Command + A on Mac to select all songs.
Step 4. Right-click and choose the Remove Download option to delete all downloaded songs in your Apple Music.
Part 3. How to Keep All Songs from Apple Music Before Deleting
Sometimes, to make room for your device, you have to delete a portion of songs that you could have kept. In this case, you can consider backing up all your downloaded Apple Music songs before deleting them. Except for backing up them to iCloud, you can also use a third-party tool to download them to other devices for permanent storage. As we know, all Apple Music songs are encrypted by a special AAC format. You have to convert the songs to a normal format like MP3. Here I would recommend a practical tool for you – Tunelf Audio Converter. Take a quick look at what Tunelf Audio Converter is.
This is a functional Apple Music converter, which also supports converting and saving Audible books and iTunes audio. It provides multiple output formats to choose from, including MP3, WAV, AAC, FLAC, M4B, and M4A with lossless sound quality. Additionally, all the converted songs will be saved with ID3 tags. No need to worry about the conversion speed, it has a 30× faster conversion speed. A large amount of songs will finish converting within a few minutes. Here’s how to explore it.

Key Features of Tunelf Audio Converter
- Convert Apple Music to MP3, WAV, FLAC, AAC, and other audio formats
- Remove DRM from Apple Music, iTunes audios, and Audible audiobooks
- Preserve the converted audio with lossless audio quality and ID3 tags
- Support the conversion of audio format at a 30× faster speed in batch
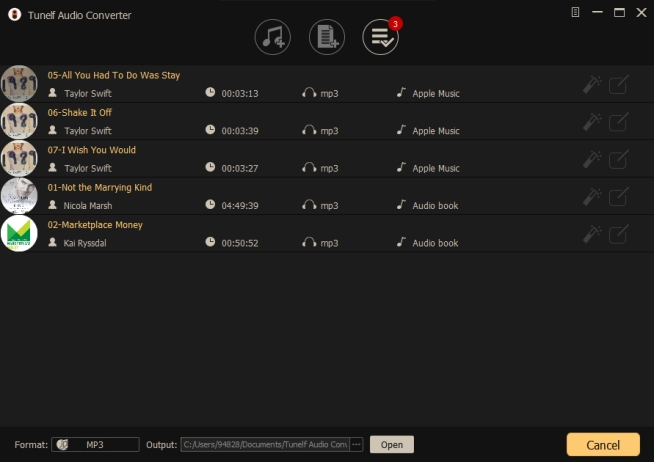
Step 1 Import Songs from Apple Music to Tunelf
Launch the Tunelf Audio Converter on your computer, then click on the Load iTunes Library icon on the top of the screen. Your Apple Music downloaded songs will be presented in Tunelf. Choose the downloaded Apple Music songs you want to convert and then tap Add to add them to the conversion list. Or, you can drag and drop the songs from Apple Music to Tunelf.
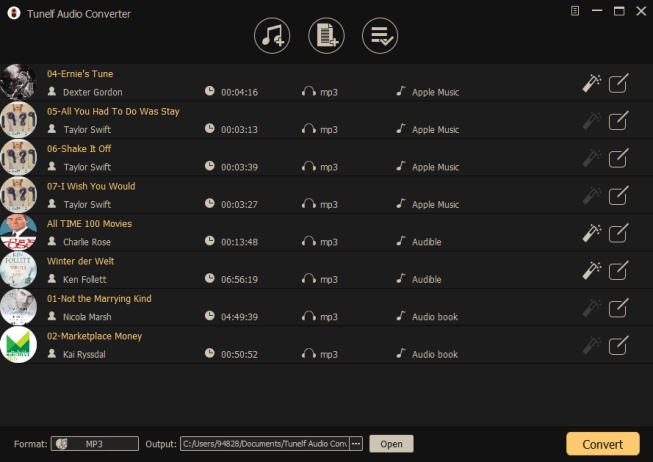
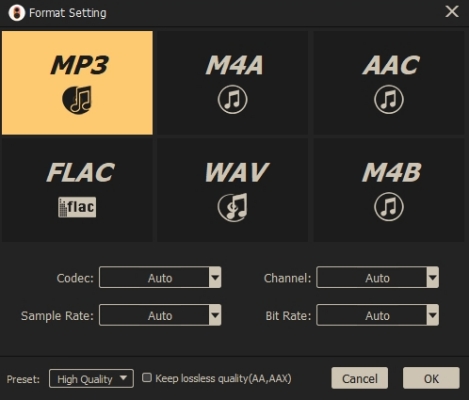
Step 2 Set Output Format for Apple Music Songs
Click the Format button on the bottom left of the panel, and choose the output format as MP3. You can click the Edit icon to edit the songs’ information about the title, album, genre, etc. Other output parameters such as sample rate, channel, and bit rate can also be set in this section. Finally, click OK to preserve all the settings.
Step 3 Start Converting Your Apple Music to MP3
Now, click the Convert button at the bottom of the screen. After a few minutes, all the added Apple Music downloaded songs will be converted to MP3. After that, you can view all the converted songs by clicking on the Converted button. Now, you can keep all your downloaded Apple Music songs before deleting them.
Part 4. FAQs about Managing All Songs in Apple Music
How to download all songs at once on Apple Music?
A: You can download all Apple Music songs at once via Smart Playlist, Shortcut, and automatic downloads. Additionally, you can download and convert all your Apple Music songs to MP3 via Tunelf Audio Converter.
How to shuffle all songs on Apple Music?
A: Go to the Library section in your Apple Music, and tap Songs, Playlists, or Albums. Then tap the Shuffle button to shuffle your Apple Music songs.
How to see all loved songs on Apple Music?
A: Open Apple Music on Mac or iTunes on Windows. Head to the Songs section under Library. Click on the Heart icon to reorder all songs. Then your loved songs will be presented at the top of the list.
How to recover deleted playlists on Apple Music?
A: If you don’t have a backup of the deleted playlist, the only possible way is to restore the entire iPhone from a backup that has that playlist, or you’ll have to recreate it from memory. But don’t worry, next time you can use Tunelf Audio Converter to backup all songs from Apple Music before deleting.
Part 5. Conclusion
By reading this passage, I guess you must know how to delete all songs from Apple Music. In this passage, we have listed several effective ways to help you remove all songs from the Apple Music library. If you want to recover the deleted songs on Apple Music, you’d better back up the songs before deleting them. Thus, you can upload them to iCloud, or use Tunelf Audio Converter to convert them into MP3 and save them forever.
Get the product now:
Get the product now: