


It’s a tide to listen to popular songs online through some online music streaming platforms. Apple Music is deemed to be the leading one for iOS users. And on the grounds of developing and increasing various requirements for music streaming, listening to music only will not be enough for us. Then the creation of new features and functions on these streaming services is hastened. Now we’re able to utilize these features to match our multiple needs. A lot of people have puzzling trouble now. They ask like can I see my loved songs on Apple Music? If yes, how to achieve that?
I was trapped with this issue before, and then I made a detailed study of Apple Music loved songs and find out the solutions. Since many people still have no idea about it, I set out to write this article for you. In the following parts, you’ll get to know the possibility to see Apple Music loved songs and the feasible methods.

Part 1. Where to Find Loved Songs on Apple Music on iPhone/Mac
How to find loved songs on Apple Music for iPhone. I could didn’t notice it, but maybe there any opportunity to see playlist with all songs where i press “Like”? Both on iOS and iTunes. Thank you!
— User from the Apple CommunityMany Apple Music users have been bothered by this issue. While you can hit the heart icon to like a song on Apple Music, it hasn’t been easy to find all your loved songs in the app. The like button is primarily designed to record your music preferences so the server can recommend better songs, artists, and playlists.
But don’t worry. This issue has been resolved in the new iOS version. iOS 17 updates how loved songs are stored on Apple Music. With this new operating system, you can easily find all the tracks you love in your Apple Music library. If you choose not to update to iOS 17 or later, there are alternative methods to give you a hand in finding loved songs on Apple Music whether you are using an iPhone or a Mac. Additionally, you can even learn the ultimate way to download your favorite tracks from Apple Music to your device and enjoy them offline without restrictions. Without further ado, let’s explore these methods in the following content.
Part 2. How to See Loved Songs on Apple Music [with iOS 17]
When you find the content you like on the Apple Music app, you can add it to your favorites. With the updated iOS 17 system, it’s a breeze for you to add tracks, albums, artists, and playlists that you are interested in favorites. Then, you can easily find your preferred Apple Music content in its app and get notifications for your favorite artists. To update your iPhone to the latest system, you just need to choose Settings > General > Software Update. Once done, try the following steps to find your loved songs on Apple Music.
1. To like a song, you can tap the favorite icon on its Now Playing screen. If you need to add a playlist or an album to your favorites, you should choose it. Then, tap the More icon at the top right corner and choose Favorites. Tap the Favorite button on an artist’s page, then you can add them to your favorite as well.

2. When you need to find your Apple Music loved songs, just go to the Apple Music app on your iOS device. Then, choose Library.
3. Select Playlists > Favorite Songs. After that, you can see all the tracks that you tapped the favorite button.
4. Alternatively, you can see the loved songs through the Apple Music sorting feature. Go to the Apple Music app and switch to the Library tab. Choose Artists, Songs, Albums, or Playlists depending on your needs. Next, hit the sort icon and choose Favorites.
Part 3. How to Find Loved Songs on Apple Music [without iOS 17]
For those who decide not to update to iOS 17, the process to get Apple Music loved songs is more complicated. Since the Apple Music app does not offer an option to let you access the loved songs directly, you need to try some alternative methods. Here we found several feasible ways, you can follow the guidance below to get the one that suits your personal situation most and enjoy your loved songs.
Option 1. Add Loved Songs to a New Playlist
If you have a habit of adding your favorite songs to the music library after marking them as love, it’s easy to find them with this method. This will require you to have an Apple macOS device (a Mac or Macbook) with an Apple Music application already installed on it. Unlike the iOS application, the macOS application allows you to browse and play the songs you’ve marked as loved. By adding them to a new playlist manually, you can access them on the Apple Music app on all your devices the next time.
Note
This method only works when you’ve added your Loved Songs to your music library every time in the first place.
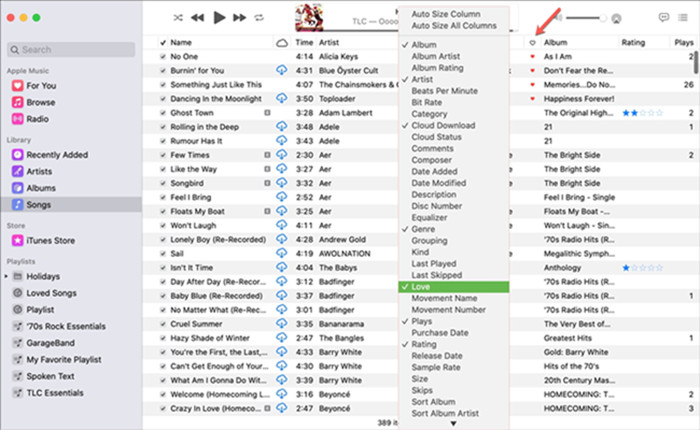
1. Launch the Apple Music app on your Mac computer.
2. Navigate to the Songs tab under Library from the left sidebar.
3. Look for the Love column which is shown as a heart icon from the header row on columns.
4. Click the heart icon on the column header to manifest all the songs you loved.
5. Press the Shift button and select all your loved songs. Then, right-click them and choose Add to Playlist > New Playlist.
6. After that, you can rename the new playlist and listen to all your loved songs in this playlist with ease.
Option 2. Create an iTunes Smart Playlist
If you don’t get all your loved songs via the method above, you can take a look at the smart playlist feature. It’ll be an easy task to check your playing history or find loved songs if you create a Smart Playlist in iTunes on your PC. A Smart Playlist will keep track of your loved songs. When you add your loved song to your library, it will be automatically added to the Smart Playlist.
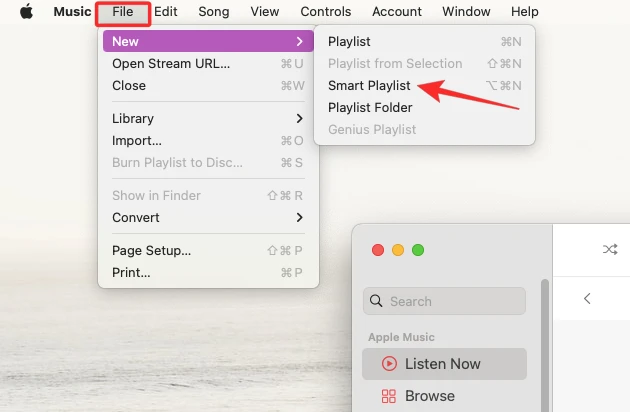
1. Launch the iTunes app on your computer and click File from the menu bar.
2. Next, click New and select Smart Playlist to create one.
3. Make sure to select match so that it will collect as you want; then select Music from the drop-down menu and set the following rule as the loved section. For example, you can change the first box to “Love”, the second one to “is”, and the third one to “Loved”.
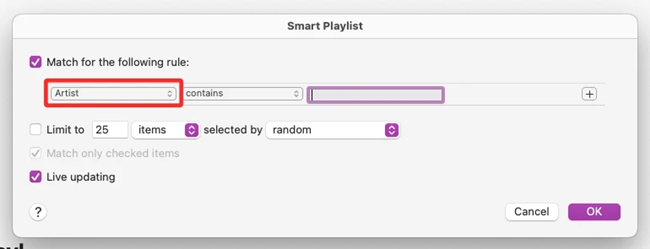
4. Once set the rules and options, tap OK to save the settings. Don’t forget to toggle on the Live updating box.
5. Now you can rename this new smart playlist and check all your Apple Music loved tracks in it.
If songs that you have marked loved do not appear in the Smart Playlist, go check if you have added them to your Apple Music library. Since this option only functions when you’ve added your Loved Songs to your music library every time in the first place too. In addition, you can try to enable the Sync Music button to sync the playlist to your iPhone.
Option 3. Request Loved Songs from Apple
If you find the creating process bothers you or is just problematic, this option might be a good choice to help you out. You can simply ask for help from the Apple Music Support Team. Just send your request about getting all of your loved songs and then you’ll receive the data that stores your media content of Apple Music on your iPhone or iPad. In this way, you can easily access your loved songs with a computer.
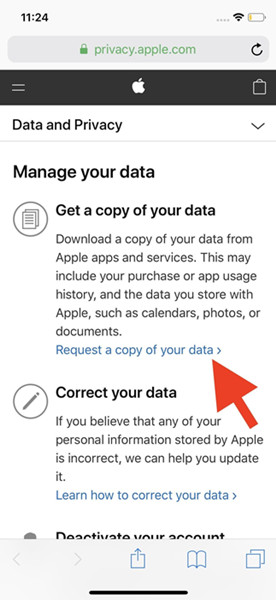
1. Go to privacy.apple.com and sign in your Apple ID.
2. Select Data and Privacy> Request a copy of your data> Get a copy of your data.
3. Select Apple Media services information> Continue> Set the file size of your download> Select Complete request.
4. You’ll receive an email from Apple, now you need a computer to open it.
5. Download the data report Apple Music sent to you.
6. Open the ZIP file entitled “apple-media-services. zips”> Select Apple Music Likes and Dislikes.csv.
Once you’ve opened this file using any spreadsheet program, you will get a comprehensive list of songs you’ve ever loved or disliked all the time.
Part 4. Bonus: How to Save Your Apple Music Loved Songs Forever
Now you’ve learned how to find loved songs on Apple Music. But you should notice that you must have an active Apple Music subscription to keep your accessibility to the loved songs on your Apple Music library. Once your subscription expires, you can not play your loved songs anymore even if you downloaded them. How can you save your loved songs on your device forever? The best method is to use a powerful and functional third-party tool – Tunelf Audio Converter.
Tunelf Audio Converter is designed to download and convert Apple Music songs to main audio formats which are compatible with other devices. You can choose to download the loved songs in MP3, WAV, AAC, FLAC, M4B, and M4A. With the help of the Tunelf software, you can easily download your favorite songs as local files on your computer. All the downloaded Apple Music files can be stored on your device permanently. If you want, you can even import them to other devices for offline playback. What’s more, the Tunelf software supports resetting the audio settings to have a personalized music experience. Why don’t you click the Download button below and have a try?

Key Features of Tunelf Audio Converter
- Convert Apple Music to MP3, WAV, FLAC, AAC, and other audio formats
- Remove DRM from Apple Music, iTunes audios, and Audible audiobooks
- Preserve the converted audio with lossless audio quality and ID3 tags
- Support the conversion of audio format at a 30× faster speed in batch
Conclusion
Since Apple Music does not offer a feature for you to check loved songs on Apple Music, you can get access to them only if you’ve added all the tracks you like to the music library in the first place. While you can take some methods above as extra tips for you to keep track of your loved songs and better manage your music library. Besides, the Tunelf Apple Music Converter offers solid support if you’d like to download those songs and keep them offline forever. Don’t forget to share or comment if you like this passage.
Get the product now:
Get the product now: