


I have for historical reasons 2 Apple IDs: A & B. I have an Apple Music subscription with B, but would now move it to A…… but not the ones that I had downloaded from Apple Music. How can I transfer those to my new ID?”
– User from Apple CommunityFor iOS users, Apple IDs are important login credentials to use all Apple software and purchase any kind of iOS product. Imagine that when you have changed a new Apple ID, all the things connected to the old ID are no longer available with your new Apple ID. You’re unable to find back those services, music files as well as videos, etc. Can you transfer music from one Apple ID to another? Well, you’ll be disappointed to find that it is hard to transfer your Apple Music to a new Apple ID. Don’t fret! We’re always here to help you out, just check this article to find out!
Part 1 Can I Transfer Music from One Apple ID to Another
As we all know, Apple ID is the credit for login and enjoying the services from Apple devices and software. We use the same one Apple ID to create accounts and connect with other services. Of course, the subscription plans you created with the old Apple ID are linked to it forever, you can’t change it to the current new one. In the same way, tracks downloaded through the Apple Music subscription service are tied to the Apple ID that holds them. Thus, it is impossible to transfer Apple Music from one Apple ID to another in a direct way.
Though it is a hard task to transfer your purchased or downloaded Apple songs to another Apple ID, you still have other alternative approaches to spare effort. Please proceed to the next part to see the methods in detail.
Part 2 How to Transfer Apple Music Library to New Apple ID
Here are two widely-used methods to transfer the Apple Music library from one Apple ID to another. One is to utilize the iTunes app to merge and organize the library for purchased items, the other is to share the text playlist over a message to the other Apple ID.
Transfer Purchased Apple Music to New Apple ID
If the Apple songs you’d like to transfer are purchased items from Apple Music, then you can transfer music from one iTunes account to another on your computer. Make sure your music files are all purchased content so that the steps below are workable for you. You will receive duplicates after this transfer.
Step 1. Launch the iTunes app on your computer and click on Edit (PC) or iTunes (Mac) on the menu bar.
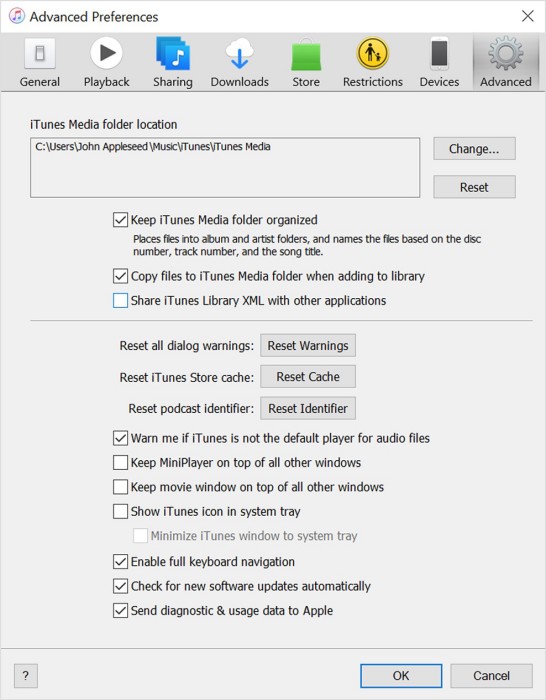
Step 2. Select Preferences > Advanced, and then go to the iTunes Media folder location section.
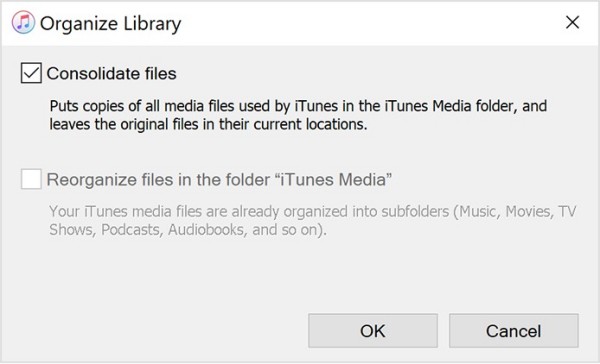
Step 3. Click File > Library, then choose Organize Library. Next, check the box named Consolidate files and tap OK to apply.
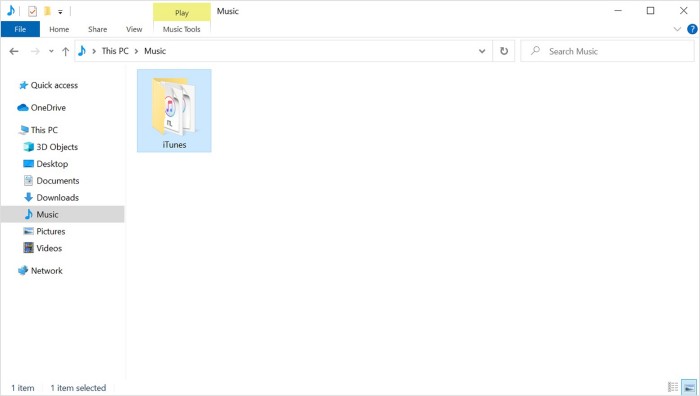
Step 4. Plug in your USB drive to your computer and drag the music folder in the iTunes media folder to the USB drive.
Step 5. Connect your external hard drive or USB drive to a new computer and open iTunes again.
Step 6. Hold down the Option key while opening iTunes and click Choose Library when a window pops up.
Step 7. Select the music folder where you store the Apple music in your local hard drive and click Open.
Share Apple Music Playlist to Another Apple ID
For those un-purchased content, even though downloaded, it is impossible to sync or transfer them to another new Apple ID. Now the only available way for you is to share the Apple music playlist to your new Apple ID by text messaging.
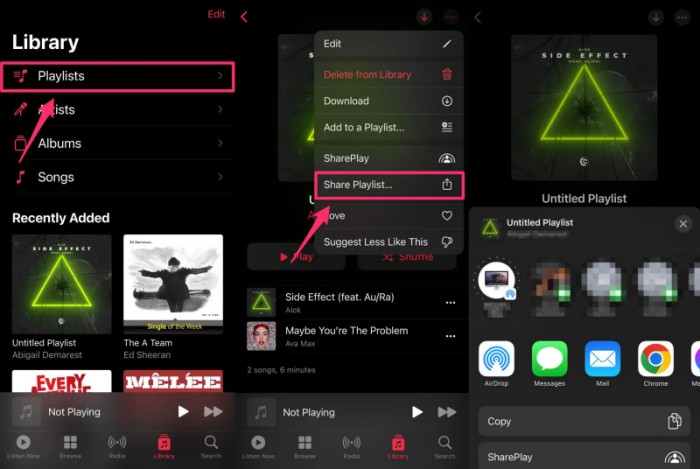
Step 1. Open the Apple Music app on your mobile device and tap Playlists in the Library tab.
Step 2. Find the playlist you want to share and tap it to open.
Step 3. Tap on the three-vertical icon at the top of the playlist page to open more options.
Step 4. Now select Share Playlist to share your playlist as you want. You can tap a recent contact at the top, use AirDrop with nearby devices, or choose to send by email or social media.
Step 5. Finally, you can tap the Copy option to copy a link to the playlist to paste it anywhere for sharing.
Part 3 How to Transfer Music from One Apple ID to Another [Best Way]
Well, some people have reported that the above method is not workable for them at all. This is tricky. Thanks to our efficient tool, you can transfer music from an old Apple ID to a new one. All you need is to download the Apple tracks offline and transfer them to your new Apple ID easily. To get this done, here we’re going to introduce a great tool to help, which is Tunelf Apple Music Converter.
Tunelf Apple Music Converter, aka Tunelf Audio Converter, is a mighty audio handler and dealer, for it can tackle three kinds of audio files from Apple Music, iTunes Music, and Audible audiobooks. Due to the DRM format on Apple songs, we cannot play them on other devices. Tunelf Audio Converter is designed to remove the download limit on these streaming audio files and download them to our local drive for listening. Tunelf supports you to convert Apple Music to 6 popular audio formats, including MP3, M4A, M4B, WAV, AAC, and FLAC. The conversion speed is 5x speed as default. While it will not destroy the original audio quality of your music and the ID3 tags will be retained as well.
Key Features of Tunelf Audio Converter
- Convert Apple Music to MP3, WAV, FLAC, AAC, and other audio formats
- Remove DRM from Apple Music, iTunes audios, and Audible audiobooks
- Preserve the converted audio with lossless audio quality and ID3 tags
- Support the conversion of audio format at a 30× faster speed in batch
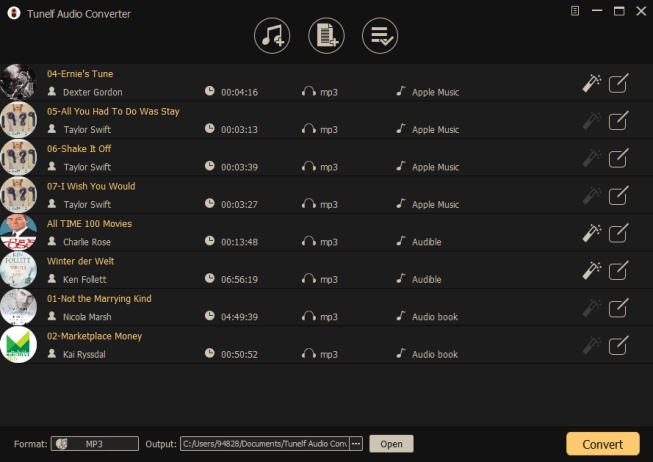
Step 1 Import Apple Music that you want to convert
First of all, you can click the Add “+” button to import the audio files you want to convert to the program; or simply drag and drop your target audio files to it. You can add several files at a time for batch conversion.
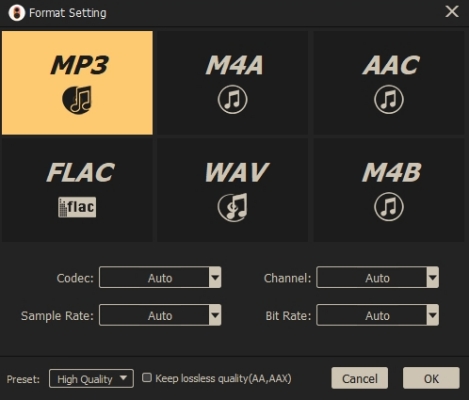
Step 2 Select output audio parameters
Once your audio files are loaded, you can click the Edit icon to edit the tag information like title, album, artists, genre, etc. You can also split the audio file via time length or chapters.
Then click the “Format” panel and choose an output format from MP3, M4A, AAC, FLAC, WAV, and M4B according to your needs. You can also customize the audio parameters like codec, channel, sample rate, bit rate, and archive folder here.
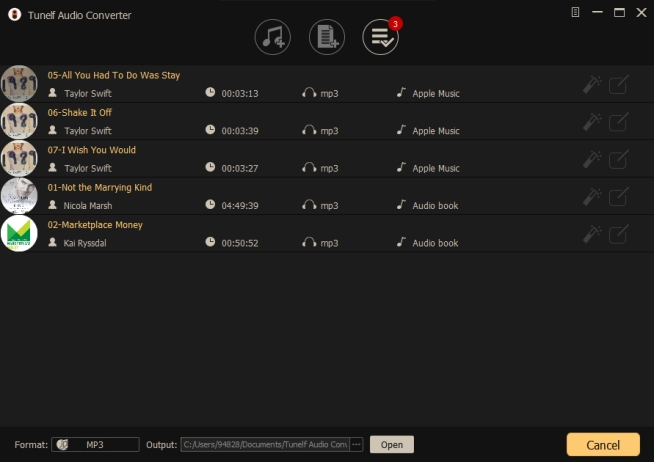
Step 3 Convert Apple tracks to MP3 files
After all your settings are done, you can now click the “Convert” button, and Tunelf Audio Converter will begin to convert the imported audio to MP3 or other audio formats you want.
Wait for a while until the process completes. You can then locate all your converted audio files by clicking the “Converted” button and transfer them to any device for enjoying offline.
Step 4 Transfer downloaded Apple Music to new Apple ID
Since you have downloaded and saved the Apple songs on your computer, you just need to upload or transfer the converted music files to your new Apple ID. A USB cable is convenient to transfer these converted local files to your new Apple account.
Final Thoughts
If you now use a new Apple ID and want to transfer Apple Music to new Apple ID, here we’ve shared the methods above. Things can be easier to get done than you expected if you have purchased them from Apple Music or iTunes Store. For other music files, things get harder. Luckily, you have the help of Tunelf software. With Tunelf Apple Music Converter, you can transfer music from one Apple ID to another with ease.
Get the product now:
Get the product now: