


The playlist is a quick path to access your favorite songs. No matter whether you are using Spotify, Tidal, Apple Music, or any other music streaming service, you can create a playlist on your own. Deezer is one of the most popular music streaming services, owning a large amount of users and a diverse music library. Many audiophiles are concerned about how to create a playlist on Deezer. To help you manage your Deezer library better, we conclude the way to create a playlist on Deezer, both on mobile and desktop. Please check the methods below.
Part 1. How to Make a Playlist on Deezer [iOS/Android]
Deezer’s playlists are available to users worldwide. To create a Deezer playlist on iOS or Android devices, make sure your Deezer mobile app version is 6.2.16 or above on Android or 8.28 or above on iOS. Before we start, you just need to install a Deezer app on your mobile device and log into your Deezer account. Now, let’s figure out how to make a Deezer playlist on your iOS or Android devices.
Step 1. Open Deezer on your device and log into your Deezer account.
Step 2. Head to Favorites and select Playlists.
Step 3. Then select Create a Playlist. (Select the Camera icon to take a photo or upload an image as your playlist’s cover.)
Step 4. Enter a name for your new playlist in the Name field.
Step 5. If you’d like your playlist to be Collaborative or Private, select the slider to enable the feature.
Step 6. Select CREATE.
Part 2. How to Create a Playlist on Deezer [Desktop]
The playlist is an important way to listen to music, whether you are in a good or bad mood, you can find the best Deezer playlists to chill out. Once you created a playlist and gathered your favorite songs together, you can share it with your friends with one click. The process of creating a Deezer playlist on the desktop is quite similar to the procedures on mobile devices. Let’s see how to make it.
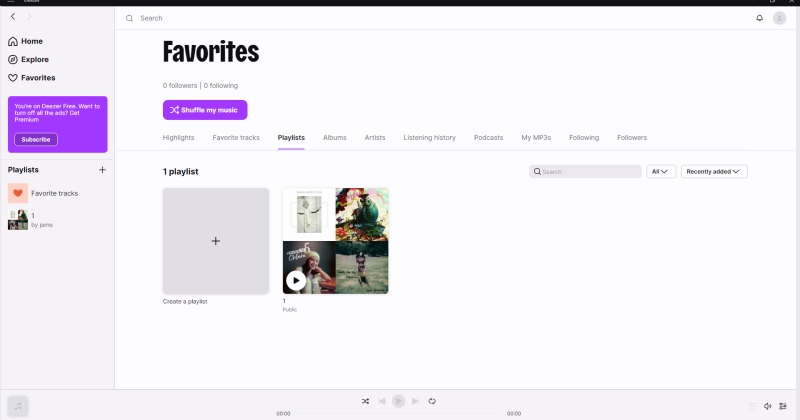
Step 1. Launch the Deezer app on your computer and go to Favorites.
Step 2. Select Playlists and choose Create a Playlist. (Select the Camera icon to take a photo or upload an image as your playlist’s cover.)
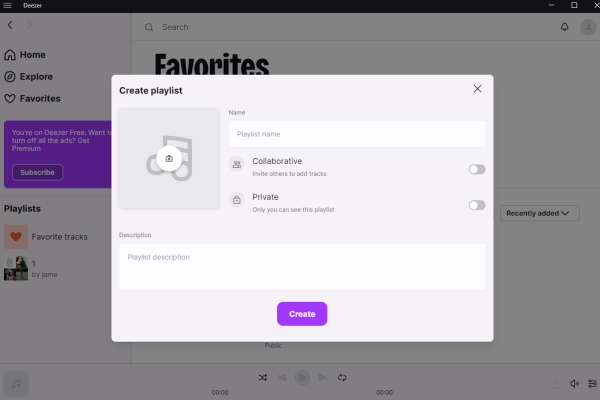
Step 3. In the Name field, enter a name for the new playlist.
Step 4. Select the slider to make your playlist to be Private or Collaborative.
Step 5. Enter a Description for the playlist if you want.
Step 6. Select CREATE.
Part 3. How to Manage Your Deezer Playlists
Now that you’ve learned how to create a playlist on Deezer, you can make your playlists on Deezer easily. Managing playlists on Deezer can offer you a better experience while listening to music. In this part, we’ll teach you how to manage or edit your Deezer playlists.
Make your Playlist Private
Deezer playlists are created to be public by default, any Deezer users can access the playlist unless you change the privacy settings. Both public and collaborative playlists are searchable and viewable to all Deezer users. To make your playlist private, simply select the Private slider on your playlist creator or editor.
Launch a Music Quiz for Your Playlist
Deezer can create a music quiz based on your playlist by using the tracks added. To do this, select the options icon next to your chosen playlist and select Launch a music quiz from the list of actions.
Add a Song to a Playlist
On mobile and desktop, you can add tracks by selecting the three-dot icon next to a track, selecting Add to Playlist, and choosing your wanted playlist. About adding songs to the playlist, you can click on Deezer Playlist Assistant to learn more.
Note: The playlist you have edited or added to most recently will be presented in the three-dot menu.
Remove a Song from a Playlist
On iOS:
Step 1. Go to Favorites, and select Playlists under Music.
Step 2. Select the playlist you want to edit, and select Edit.
Step 3. Tap the Remove icon next to the track you want to remove.
Step 4. Tap Delete.
On Android:
Step 1. Go to Favorites, and select Playlists under Music.
Step 2. Select the playlist you want to edit, and select Edit.
Step 3. Swipe the track to the left to remove it.
On desktop:
Step 1. Select Playlists under Favorites.
Step 2. Select the playlist you want to edit.
Step 3. Select the checkbox next to the track you’d like to remove.
Step 4. Click Delete.
Part 4. Best Way to Share Deezer Playlists Without Limits
Don’t you want to share your favorite playlist and share your musical tastes with your friends? It’s such an exciting thing to share the playlists. But how can we share the Deezer playlist with others? Only the sharer and receiver are subscribing to Deezer, the content can be shared and received successfully. Once your subscription expires, you may not be accessible to some songs in the playlist. Since all tracks in music streaming services are protected by DRM, we can only enjoy Deezer tracks in the app. Even downloaded Deezer songs are encrypted with DRM.
There are so many restrictions to listening to Deezer music, let alone sharing your Deezer playlist with others. The best way to break this situation is to remove the DRM protection from Deezer. To do this, you just need a Deezer playlist downloader – Tunelf Deezer Music Converter. this is a Deezer music downloader, aiming to convert and download Deezer music to MP3, FLAC, AAC, WAV, M4A, and WAV format with 100% lossless audio quality. Moreover, it supports 5× faster conversion speed, all tracks will be converted to your device within a few seconds. And the ID3 tags of the tracks will be retained as well. After converting your Deezer songs or playlists to MP3, you can share them with your friends without limitations. Now, let’s see how to use this tool.
Key Features of Tunelf Deezer Music Converter
- Keep Deezer songs with the lossless audio quality and ID3 tags
- Remove DRM and ads from Deezer music after the conversion
- Download Deezer songs, albums, playlists, podcasts, and radios
- Convert Deezer music tracks to MP3, FLAC, and more in batch
- Freely customize lots of parameters like format, bit rate, and channel
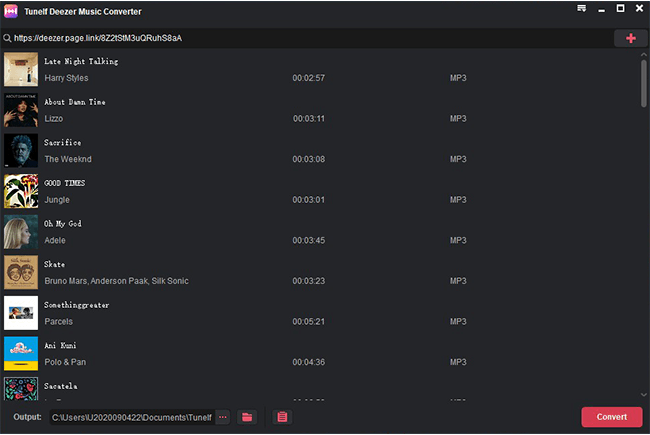
Step 1 Import Deezer Playlist to Tunelf
Open the Tunelf Deezer Music Converter on your computer, and Deezer will be loaded on your computer automatically. Then import the Deezer playlists you desired to the converter by dragging and dropping from Deezer to Tunelf. Or copy the link of the target playlists in Deezer and paste the link into the search bar of Tunelf.
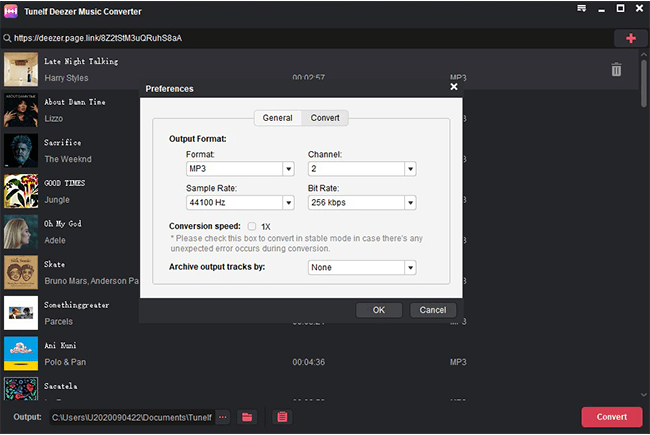
Step 2 Customize the Output Deezer Playlist Parameters
Navigate to the Menu bar in the top right of Tunelf, and choose Preferences from the drop-down menu. Then there will pop up a settings window where you can customize the output audio format, bit rate, channel, and sample rate of your added tracks. Except for MP3, there are M4A, M4B, AAC, FLAC, and WAV formats for you to choose from. Select MP3 as the output format. Once the setting is done, click the OK button.
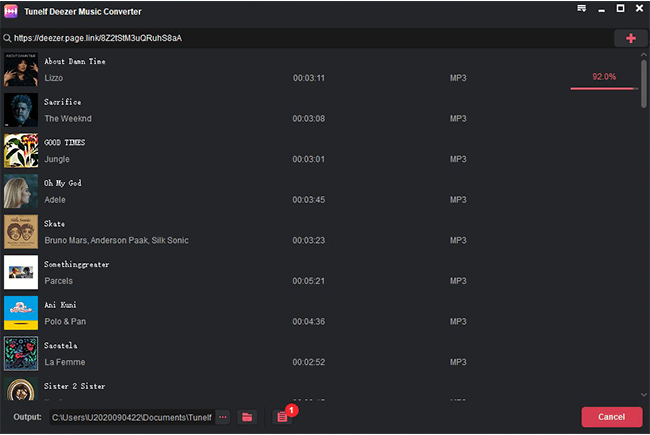
Step 3 Start Converting Deezer Playlist to MP3
Now, click the Convert button to start converting the Deezer playlist. All tracks will be downloaded and converted within a few minutes. After converting, you can click the Converted button to browse all converted Deezer songs and then upload them to your devices for offline listening. Then, you can share your converted Deezer playlist with your friends freely.
Part 5. Conclusion
After reading this passage, you must be clear about how to create a playlist on Deezer. Additionally, we offer you some common ways to manage and edit your Deezer playlist. Moreover, if you are looking for a method to share your Deezer playlist with others, you can use the Tunelf Deezer Music Converter to break the DRM restriction at first. Hope you enjoy your Deezer music journey.
Get the product now:
Get the product now: