


Whether your music streaming service is Apple Music, Tidal, Deezer or Amazon Music, etc. A good playlist created on your own is absolutely a quick path to access your favorite music tracks in one place. Spotify, one of the most popular streaming platforms, owns a large solid audience foundation due to its diversified and rich music library. And what many people concerning about is the way how to create a playlist on Spotify on multiple devices.
Now in this post, I’m going to illustrate the methods to create a Spotify playlist on your mobile and desktop apps. Check below!
Part 1 How to Make a Spotify Playlist on Android/iOS Devices
Before the procedures, here’re some basic things you’ll need in the process: A Spotify account, a Spotify app installed, and mobile or desktop devices. Now let’s first figure out how to make a Spotify playlist on your Android and iOS devices.
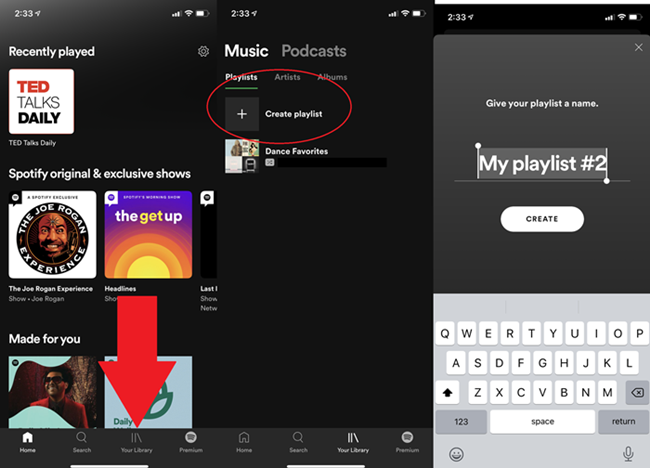
Step 1: Open the Spotify mobile app and select the Your library tab at bottom of the screen.
Step 2: Tap the Plus sign symbol on the top right of the screen.
Step 3: A window will pop up and ask you to name the playlist. Enter a name and tap Create.
Step 4: Tap the Add songs button to add your liked artists and tracks to your playlist.
Step 5: When you find a song you want, tap the Plus sign symbol next to it to add it.
Part 2 How to Create Playlist on Spotify Desktop App
Creating a Spotify playlist on your Mac or PC is similar to the procedures on mobile devices. Here’s how to create a new playlist on the Spotify desktop app on a PC or Mac computer.
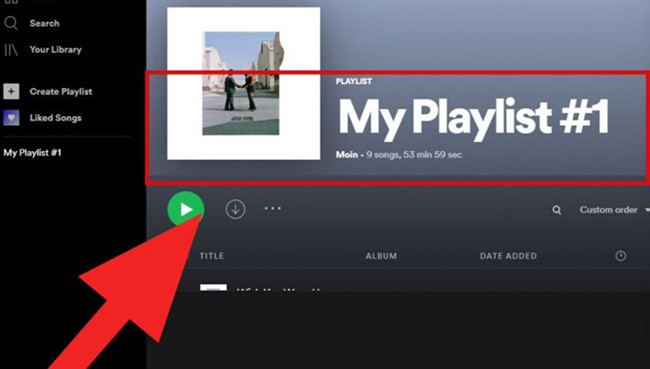
Step 1: Select the + create playlist button on the left side of the window.
Step 2: Spotify will automatically give it a temporary name, like “MyPlaylist#1.” You can change it anytime you want.
Step 3: Next you can edit your playlist by writing a description and adding an image to represent it.
Note: if you don’t import a custom playlist image, Spotify will automatically generate an image based on the album covers from your playlist.
Step 4: Next just use the Search bar to look for the music tracks you want to add to your playlist.
Step 5: When you find songs that you want, click the Add button suspended to the right of the title to add it.
In addition, if you come across a song you like from other playlists or Spotify-recommended music, you can add it to your personal playlist. Just click the three-dot icon beside the song name and select the Add to playlist option to add it to your playlist.
Part 3 More Tips: How to Manage or Edit your Spotify Playlists
Now you’ve created your own playlists successfully. If you’d like to edit the playlist or more things, this part will offer you the most common functions you want to do with your playlists.
1. Make your playlist public or private. It’s okay to hide your playlist if you want to set your playlist as private. To make it secret, go to the More option which is under the playlist name and next to the Play button, then select Make Private. If you want it to be visible, select Make public instead.
2. Remove a song from your playlist. If you’re about to remove a single from your playlist, either right-click on the song or select/tap the three-dot icon/More button to the right of the song information, then select Remove from this playlist.
3. Make your playlist collaborative. If you want to share this playlist with other creators to build collaboratively, tap the little Head and shoulders icon with the little plus sign or select the three-dots button under the playlist’s name, then select Invite collaborators. Here you’re able to select the ways to send invitations, such as links, WhatsApp, text messages, etc.
4. share your playlist with others. You can also easily share your playlist with your friends or others. Simply do this by clicking or tapping the More button beside the playlist’s name and navigating to the Share option. Here you can choose how to share your playlist, by copying a web link or etc.
5. Delete the whole playlist. If you get bored with this playlist, you can delete the whole playlist by selecting the More button > Delete playlist > Delete.
Exclusive: Best Method to Download Spotify Playlists Locally
Since Spotify strictly followed the principle of Digital Right Management to protect its music, it’s impossible to export Spotify music for streaming in other places, let alone download them as MP3 files. But the days of frustration were gone, you now have many available choices. Of course, if you want to download Spotify playlists to MP3 files, you’ll need this tool – Tunelf Spotibeat Music Converter. The below introduction shows why Tunelf Software ultimately triumphed and how it works to get DRM-free music tracks.
Tunelf Spotibeat Music Converter is a professional and trustworthy software for all Spotify users. Since Spotify music is encrypted with special codes, we have to remove the DRM restriction on music tracks. Tunelf enables you to remove the limit and download DRM-free audio files to MP3, WAV, FLAC, AAC, M4A, and M4B without hassle. Then you’re able to access music easily and make it possible to stream Spotify music whenever and wherever you want. Plus, even with fast conversion speed, the music quality will not be destroyed and the ID3 tags will be retained as well.

Key Features of Tunelf Spotify Music Converter
- Download Spotify playlists, songs, and albums with free accounts easily
- Convert Spotify music to MP3, WAV, FLAC, and other audio formats
- Keep Spotify music tracks with lossless audio quality and ID3 tags
- Remove ads and DRM protection from Spotify music at a 5× faster speed
Next is the tutorial about how to download Spotify playlists locally with Tunelf Spotibeat Music Converter.
Step 1 Select Spotify music for conversion
First, launch Tunelf Spotibeat Music Converter and it will run the Spotify app at the same time. Since the trial version only allows you to convert the first three minutes of your music tracks, it’s better to sign up for Tunelf Spotibeat Music Converter to get the full features. Now you can copy and paste to import Spotify music to the program, or simply drag and drop to load in music files.
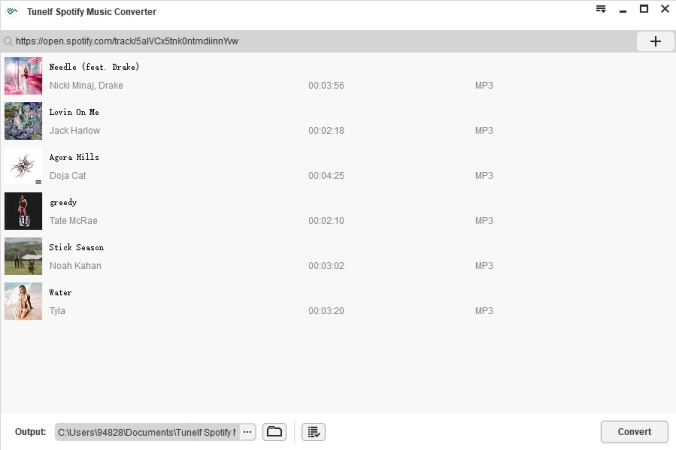
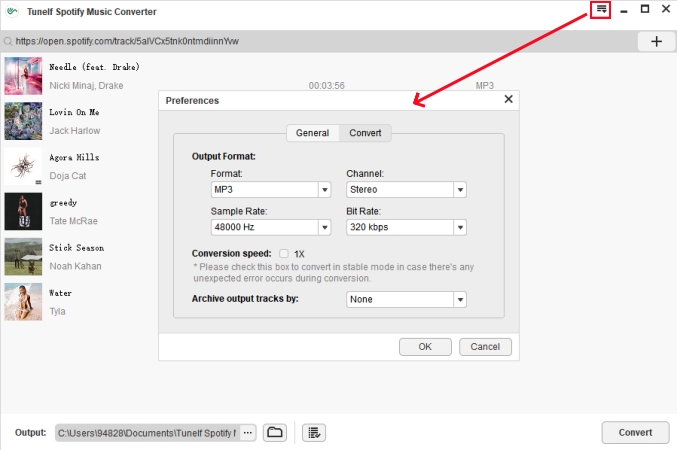
Step 2 Adjust the output audio format
Tunelf allows you to customize the output audio format and adjust audio parameters like sample rate. You can get Spotify music for your personal demands. Now navigate to menu > Preferences > Convert to set up output audio formats.
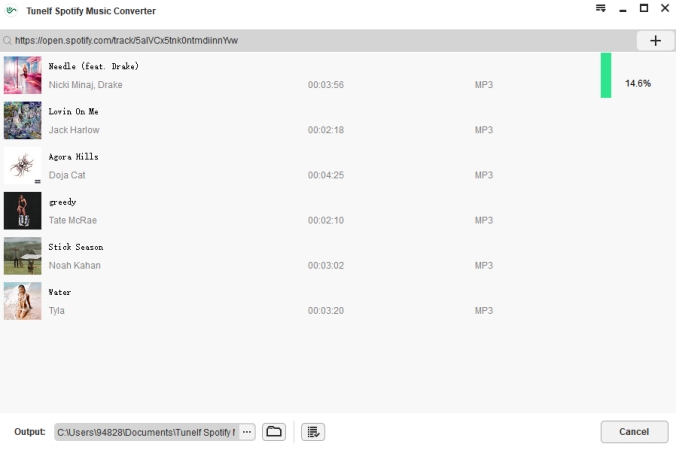
Step 3 Convert Spotify music to MP3 local files
Once set the format, click the Convert button to start the conversion. The converter for Windows will be conducted with a 5x conversion speed. Just have a cup of tea or coffee and then the conversion will be completed. You can locate them from the Converted panel. Congratulates! You now can access the Spotify playlist in your local folder on your computer and stream them on any device with ease.
Wrap Up
In the above discussion, we’ve shown the method to create a playlist on Spotify with details. Meanwhile, we strongly recommend you install Tunelf Spotibeat Music Converter to download Spotify playlists for offline listening forever. If this post helps you, it would be appreciated if to share it with others or on social media. Looking forward to your comments.
Get this product now:
Get this product now: