


Why does tidal take up so much storage space and how can I minimize it?
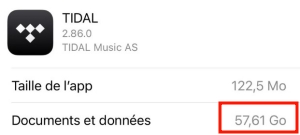
— User from RedditIf your device is running out of storage space, have you ever noticed the Tidal app which may have occupied much storage space on your phone? Perhaps, you’re unaware of it but when you check it, you’ll surprisingly find that it did cache large-sized files. In this case, we suggest you clear Tidal cache to free up your device storage space. Luckily, we offer the guide below to save your efforts.
Without further ado, let’s get a closer look at the detailed tutorial to clear cache Tidal on your mobile and desktop devices. And feel free to get a useful tip to free up Tidal storage with external storage.
Part 1. Why Do We Clear Cache Tidal
Cache files are the temporary files stored in your device as default. Every time you open the app and stream, it stores caches automatically. This benefits us when we want to access the previous listening tracks without taking more time to load since they have already cached the last time we listened to them.
But at the same time, this will make the cache file too large and occupy too much space on our device. Once the remaining storage space on the device is insufficient, the Tidal app will not work properly and smoothly. Moreover, the large-scale caches stored too much data, which may contain corrupted files. And the corrupted files will cause many bugs and errors on the Tidal app and prevent you from listening to Tidal music normally.
Therefore, it is necessary to clean the Tidal cache files from time to time so that you can ensure a smooth music experience. We have illustrated the steps with details below, follow them to clear the cache on Tidal with ease.
Part 2. How to Clear Tidal Cache on iPhone/Android
The Tidal mobile app does not offer an option to clear the cache, but you can set it up with the built-in Settings app. Here is the how-to guide on clear cache Tidal iPhone and Android.
2.1 Clear Tidal Cache iPhone
It is not possible for iPhone users to check the app data and files on Settings. Thus, if you want to clear Tidal cache on your iPhone, you will need to offload this app. As a result, all the current cache will be removed. Then, you can download the Tidal app back for use.
Step 1. Launch the Settings app from your iPhone.
Step 2. Scroll down to find General and select iPhone Storage.
Step 3. Under iPhone Storage, you can see your storage space as a whole and a list of apps.
Step 4. Scroll to locate the Tidal app and tap it.
Step 5. From here, select the Offload App option to clear cache Tidal iPhone.
2.2 Clear Tidal Cache Android
For Android users, clearing the Tidal cache is an easy option. The storage settings offer you a valid option to clear the Tidal cache directly. Also, you can find the cache files on the File Manager app and clear them manually.
Option 1. From the Settings App:
Step 1. On the Home screen of your Android phone, press and hold the Tidal app icon until a menu appears.
Step 2. Tap the icon with i to enter the app’s settings. Or you can go to Settings > Apps > Tidal to set up, too.
Step 3. On the detail page, tap Storage & cache and then Clear cache.
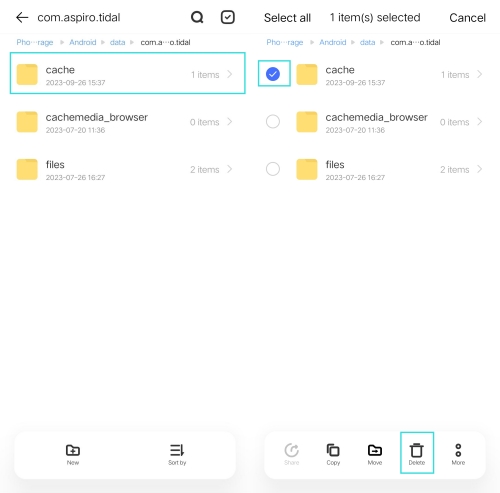
Option 2. From the File Manager:
Step 1. Open the File Manager app on your Android device.
Step 2. Follow this path to locate where Tidal caches are stored: Internal Storage/Android/data/com.aspiro.tidal/
Step 3. Select the cache folder and choose Delete.
Part 3. How to Clear Tidal Cache on Windows/Mac
Unlike Tidal mobile app users, Tidal desktop app users fall on their feet since they can directly clear Tidal cache on the Tidal desktop app. If you are using the Tidal desktop app, it is much easier to clear Tidal cache than mobile devices. Here’s how.
3.1 Clear Tidal Cache Windows
Option 1. From the Tidal App
Step 1. Open the Tidal app on your PC and click the three lines icon from the upper-left corner.
Step 2. On the dropdown menu, select Help > Troubleshooting > Clear Cache.
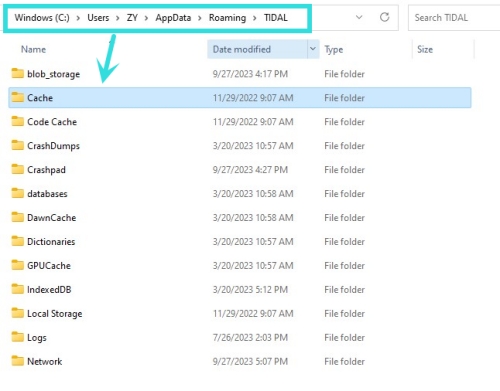
Option 2. From the File Explorer:
Step 1. On the File Explorer, go to this location: C:\Users\[Users’ Name]\AppData\Roaming\TIDAL
Step 2. Right-click the Cache folder and choose Delete.
3.2 Clear Cache Tidal Mac
Step 1. Launch the Tidal app on your Mac and click the menu icon in the upper-left corner.
Step 2. Select Preferences and then Cache > Clear Cache.
Part 4. How to Store Tidal Songs to SD Card/USB Drive
In truth, Tidal uses too much storage principally because of the Tidal downloads. The more Tidal songs or videos downloaded, the more space Tidal took up. So you can try to delete Tidal downloads to free up storage. Given that you are not willing to delete Tidal downloads, using an SD card or USB drive to store your Tidal songs is the best solution.
But one thing you have to know: like most streaming services, Tidal also applies DRM technology which limits you playing Tidal songs within the Tidal player. Even though you’ve downloaded songs on Tidal, they are unplayable files without the Tidal app, let alone move them to an SD card or USB drive for listening.
Fortunately, Tunelf Tidal Music Converter can solve this knotty problem. As a simple yet efficient music converter for all Tidal users, it brings convenience to tack with the conversion of Tidal music to MP3 and other popular audio formats. In the process of converting, Tunelf removes DRM from Tidal. Even though you are using a Tidal free account, Tunelf is able to help you download Tidal songs. If you are a Tidal subscriber, it also enables you to download Tidal HiFi and MQA quality yet taking up less storage. Thanks to the advanced technology, you can convert playlists in batches at 5 faster conversion speeds. After conversion, storing Tidal on an SD card or USB drive to free up storage cannot be easier. And you are free to play these Tidal files anywhere at any time.
Key Features of Tunelf Tidal Music Converter
- Download any Tidal content, including songs, albums, playlists, and artists
- Support exporting Tidal music to MP3, AAC, FLAC, WAV, M4A, and M4B
- Preserve a whole set of ID3 tag information in the downloaded Tidal songs
- Handle the conversion of Tidal music up to 5× faster speed and in batch
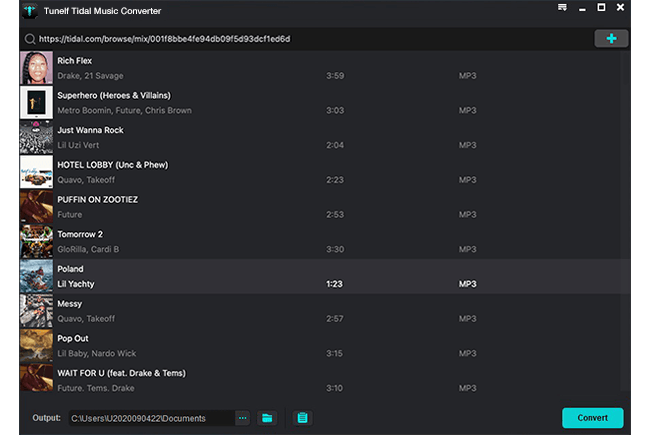
Step 1 Import Tidal Tracks to Tunelf Program
Tunelf offers a free trial version for you, so install it on your Windows or Mac to have a try. When you launch Tunelf, it will run Tidal at the same time. On the Tidal player, choose a song or playlist by clicking Share > Copy Link and paste the link to the search bar, then click the plus icon to load music files.
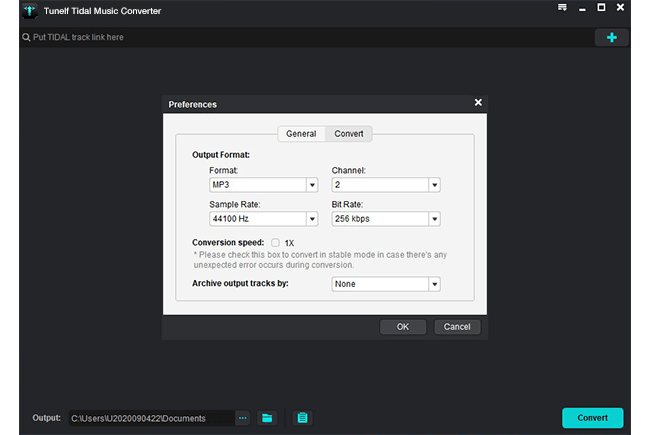
Step 2 Configure the Output Audio Parameters
Once the Tidal song is loaded in Tunelf, you’re able to adjust the output audio parameters. Navigate to the Menu icon (located at the top-right corner) > Preferences > Convert, and select the output audio format from MP3, WAV, M4A, FLAC, M4B, and AAC. To back up your Tidal songs with smaller memory, MP3 is what we recommend. You can also configure other specific parameters like the sample rate, bit rate, and channel for better sound performance. After changing, don’t forget to click the OK button to save them.
Step 3 Download Tidal Music Locally for Backup
After setting the formats, you can click the Convert button to start the conversion. It’s no problem to convert a batch of music files. You’ll only need to wait for a short time till it is finished. When the conversion is over, you can access the converted music files easily in your local folder by clicking the Converted icon.

Step 4 Copy Tidal Songs to SD Card/USB Drive
Later on, you can upload or transfer Tidal music to an SD card or other devices for backup easily. Insert your SD card into the card reader or prepare your USB drive first. Then plug the reader or the USB drive into the USB port of your computer. Locate the folder where you store the converted Tidal songs and you can directly move those converted Tidal music files to the SD card or the USB drive. After transferring, you can connect the SD card or USB drive to any device like speakers or TVs for listening.
Part 5. FAQ about Tidal Cache
Q1: What can I do to free up the storage space that Tidal occupied?
A: Except for clearing the Tidal cache, you can also delete your downloaded song to free up your storage space. Also, you can change the audio quality to low before you download music. Still, the best method is to download Tidal music to an SD card or USB drive via Tunelf Tidal Music Converter.
Q2: How do you clear history on Tidal?
A: If you want to clear your listening history on Tidal, you should enter the Now Playing screen first. Then, open the play queue and find the recently-played songs at the top right corner. Re-play the first track and all the history will be cleared.
Q3: Where are Tidal files stored?
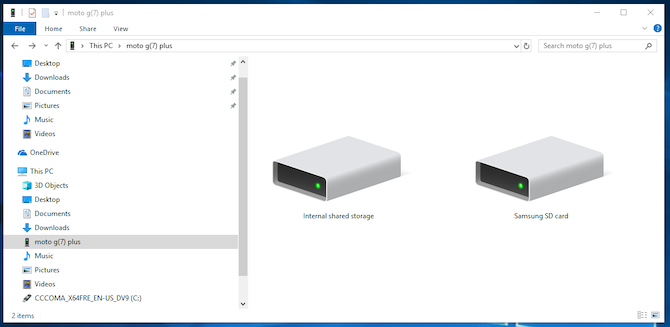
A: To find the downloaded Tidal files on your device, you may need the help of the File Manager app. Try to search keywords like Tidal and music to find the downloaded files. Or, if you have a memory card, you can insert it into your Android phone and change the download destination. Then, you can find the files on your card quickly. Here are the steps to change the Tidal music download destination.
1. Open the Tidal app on your Android phone and tap the profile icon at the far right bottom.
2. Then, go to the Settings section by hitting the three dots icon at the top right corner.
3. Select My content > Download destination > Memory card.
Summary
People may be unaware of Tidal stores caches at a rather quick speed and most of the files are useless but only occupy the space. The good way is to clear cache Tidal to free up your device’s storage space. In the above discussion, we got to know how to clear Tidal cache on iPhone/Android/PC/Mac. Meanwhile, in case you want to delete Tidal storage without losing Tidal downloads, you can back up Tidal music on an SD card or USB drive with the help of the Tunelf Tidal Music Converter.
Get the product now:
Get the product now: