


Amazon Music owns an extensive music library and provides over 100 million songs for all users. Thankfully, you can manage your Amazon Music play queue by adding songs and removing songs, only if you are an Amazon Music Unlimited subscriber. After personalizing the play queue, then you don’t need to scroll down to find the songs that you want to listen to. Besides, you can also change the download queue of your Amazon Music. The following content will tell you in detail how to personalize and control your Amazon Music queue. You just find the method according to your device.

Part 1. How to Personalize Amazon Music Queue on iPhone/Android
With personalizing Amazon Music play queue, then you don’t have to find your favorite songs or songs you have suddenly been wanting to listen to lately anymore. When you can personalize the playback order of the music you want to listen to, your experience is greatly enhanced at the same time. Therefore, just take the following steps to personalize your own Amazon Music playlist.
How to Add Songs to Amazon Music Play Queue
When you open your Amazon Music and stumble upon a favorite song. Maybe you would like to add this song to your current play queue, then you can follow the steps below.

1) Head to your desired song.
2) Tap three dots next to the item, then select the Add to Queue button.
How to Remove Music from Amazon Music Play Queue
Maybe at some point, you got bored with some songs on your current play queue, but most of the songs on the play queue you still like. For that, you need some operations to remove some items from your play queue. Just take the following steps.

1) Tap one song in the library.
2) Head to the Now Playing view, then tap the icon in the bottom left corner.
3) Then tap the three dots next to the song that you want to remove from the play queue.
4) Select the Remove from play queue button.
How to Clear Play Queue on Amazon Music
If there are some play queues containing many songs that you don’t like, then you maybe want to clear the whole play queue. Then these steps below will help you.
1) Head to a song’s Now Playing view, then tap the icon in the bottom left corner.
2) Tap CLEAR on the bottom bar.
3) Tap the Clear button to confirm it.
How to Adjust Play Queue on Amazon Music
Generally, your Amazon music will play in the order of your play queue. If you want to move some songs you’ve been wanting to listen to the front of the play queue, you can adjust the order of these songs.

1) Tap the icon in the bottom left corner of the Now Playing view.
2) Tap and hold on to the six dots next to the song, then you can drag it to suitable order.
How to Make Amazon Music Save Play Queue as Playlist
After you personalize the song play order, then you may want to save them as a playlist according to your demand. That way, you can have a playlist that contains all your favorite music afterward. Look at the following steps and you will get it.

1) Tap the icon in the bottom left corner.
2) Tap the Add icon at the bottom right corner. Then you can create a new playlist based on your current play queue.
3) Create a name for the new playlist and consider setting it as Public or not.
Note
It is worth noting that saving the play queue as a playlist is just for mobile phones.
Part 2. How to Personalize Amazon Music Queue on Mac/Windows
If you are an Amazon Music Unlimited subscriber with a desktop, then you also personalize your play queue available. Please look at the following content.
How to Add Songs to Amazon Music Play Queue
Like Amazon Music Unlimited users with mobile phones, you can also add songs to the play queue on your desktop app.
1) Launch the Amazon Music app and find your favorite items like a song.
2) Click the three dots button next to the song, then in the window that pops up select Add to queue.

3) Then you will get a message Song added to Play Queue which means you add to queue successfully.

How to Remove Music from Amazon Music Play Queue
For the same reason, if you want to remove an unfavorable song from your play queue, you can also take some operations on the queue list.

1) Head to the play queue and find the song you want to remove from the queue.
2) Click three dots at the end of the song.
3) Then click Remove from queue.
Note
You can also remove the songs from the queue in bulk. View the queue page, then press and hold on to the CTRL button and select the songs that you want to remove. Right-click on a selected song and choose Remove from queue
How to Clear Play Queue on Amazon Music
If you listen to the same song list over again and again, you’re bound to get bored. Then you may want to clear the whole queue at once, just take some easy steps to realize it.
1) Head to the Play Queue that you want to clear.
2) Click the Clear Queue button under Play Queue.
How to Adjust Play Queue on Amazon Music
Thankfully the app on the desktop also offers the feature of adjusting the play queue. Then it means you can also get a play queue that satisfied your demand on your desktop.
1) View the Play Queue page.
2) Drag and drop the item to your preferred position.

3) You can also right-click on one song and choose Play Next if you want to listen to it later.

Part 3. How to Control Amazon Music Download Queue on Desktop/Mobile
In addition to the personalization of the playback queue, there are also some users who also want to know how to control the download queue. In the following content, you’ll learn how to control the download queue of Amazon Music on your mobile phone or computer.
On Mobile
Firstly, you have to make sure you know how to download music from Amazon Music and add it to your download queue if you want to adjust it. Then, when you scroll down your library page to find the Download queue button, tap it and come to the Downloads page. This way you can see the status of your download.

On that screen, you can start or pause the items you’re downloading at will by clicking the button next to it. You can also drag the bar of every song from right to left and tap Cancel to remove the downloaded songs.
On Desktop
Just like the operation on your mobile phone. Head to your Amazon Music to find the song that you want to download, then click the download icon or three dots next to the song. Find Downloading page in your library, then you can see the all items you have added to download.

On this page, you can click the three dots at the end of every song. Then you can choose Cancel Download to remove it from the download queue.
Part 4. Bonus Tip: Get Amazon Prime Music Download Queue
You should not worry about the personalization of the play queue if you are a user of Amazon Music Prime. As you know there are some restrictions for Amazon Music Prime members, and the feature of personalizing the play queue is one of the limitations. In this situation, you need a tool to break the restriction so that you can adjust the download queue and play queue at will.
A third-party tool named Tunelf Amazon Music Converter can help you download songs from Amazon Prime Music, Music Unlimited, and HD Music so that you can adjust the Amazon Music queue. What makes the converter so powerful is its ability to remove DRM from Amazon Music. Then owing the converted Amazon Music files, you can also transfer them to other devices to play offline. In addition to this feature, a few others maybe meet your need. Now, you can take the following steps to try it.

Key Features of Tunelf Amazon Music Converter
- Download songs from Amazon Music Prime, Music Unlimited, and HD Music
- Convert Amazon Music songs to MP3, AAC, FLAC, WAV, M4A, and M4B
- Handle the audio conversion of Amazon Music at a faster speed of 5×
- Ensure the output audio quality while retaining ID3 tags and metadata
Step 1 Add Amazon Music to Converter
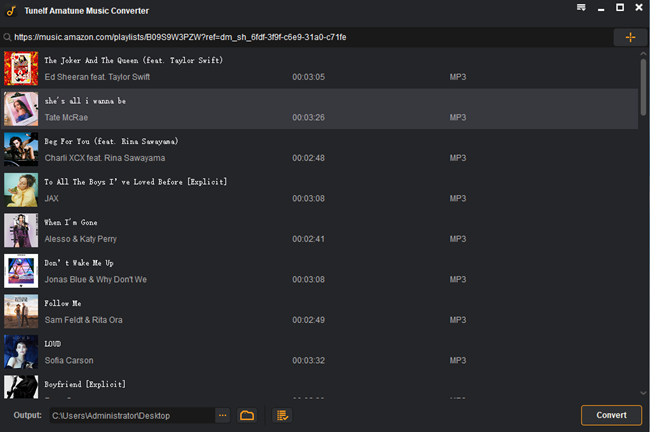
Once Amatune Music Converter is installed on your device, launch it and your Amazon Music will run at the same time. Then go to the Amazon Music app to choose the items you want to download. Copy and paste the relevant links to the search bar of Tunelf Amatune Music Converter.
Step 2 Personalize the Output Format and Parameters
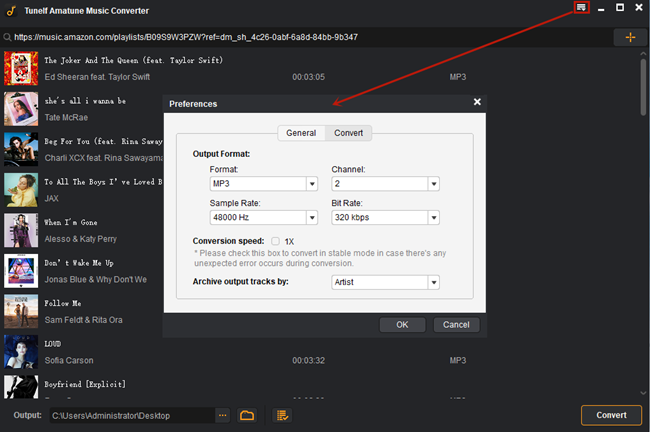
After you finished the adding, Click the button in the upper right corner and choose Preferences. You can personalize your output format, channel, sample rate, and bit rate on that page. Then click the OK button after you finish the settings.
Step 3 Start the Conversion of Amazon Music
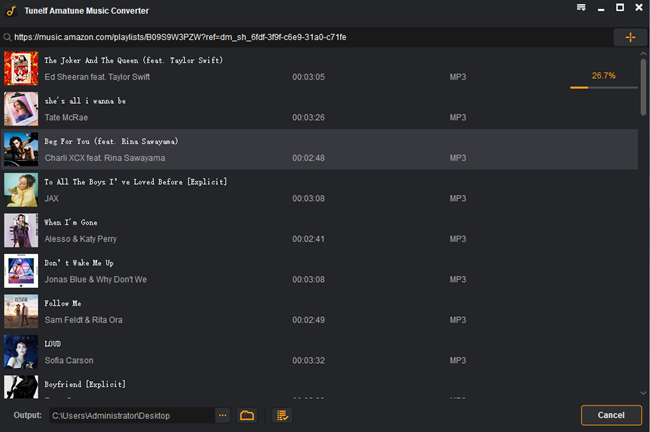
Now you can browse the added songs and make sure they are correct. The next step is to click the Convert button to start the conversion. A few moments later, you will get the converted files of Amazon Music successfully. Owing these files, you can adjust their queue at will and you can play them offline forever.
Conclusion
All the operations of personalizing the play queue just for a better experience of listening to music. Hope the above guide will help you realize that. However, the most recommended guide especially for Amazon Prime Music members is Tunelf Amazon Music Converter. You can take other more Personalized settings with converted Amazon Music files.
Get the product now:
Get the product now: