


Streaming music is a common subject and we’re quite familiar with this. It doesn’t even to be extra notice to play some music while holding most of the social activities, campaigns, or just a home family member party. For instance, I often play Apple Music songs as the background music when holding a private party or inviting my friends to my house. But one problem remains remarkably important and needs to be completed, that is how to play Apple Music on HomePod as Background music or etc.
We know HomePod is a common audio speaker and your home theater. And many people still have problems when streaming Apple Music on HomePod, especially for those newbies. But you don’t need to worry about this issue anymore as I will illustrate the methods to play Apple Music on HomePod in the following parts.

Part 1. How to Play Apple Music on HomePod
When it comes to adding Apple Music to HomePod for playing, there are several methods actually. With the solutions below, it’s easy to stream your favorite Apple Music on HomePod.
Method 1. Play Apple Music on Homepod by Using Siri
The most common and easiest way is to play Apple Music on HomePod by simply making voice commands to Siri. You can connect your Apple Music to your Homepod and control your music playing by using Siri.
Step 1. Download the Home app on your iPhone.
Step 2. Set up your HomePod and log in with your Apple ID.
Step 3. Ask HomePod to play Apple Music by saying “Hey, Siri. Play [the title of song]”. Also, you can say other sentences to control the music playing.
This method is super easy, but it may not available on every HomePod. In fact, there are some older versions of the HomePod doesn’t enable this. If you’re in this situation, then move to the next method.
Method 2. Stream Apple Music on HomePod via Apple AirPlay
When your HomePod doesn’t have the feature to control by Siri and you’re using an iOS device with the AirPlay feature, you can stream the music to Homepod via AirPlay. The steps are below.
On iPhone:
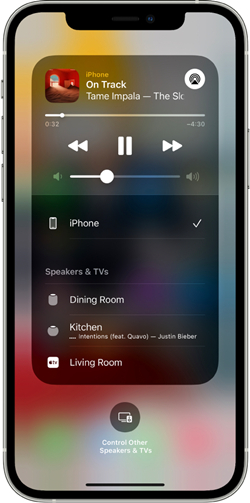
1. Open your Bluetooth and make sure your iOS device and your HomePod are connected to the same network.
2. Open the Control Center by swiping up from the bottom or swiping down from the top right corner.
3. In the showed-up window, choose Music and then tap the Airplay icon.
4. You’ll see a list of available devices, then tap the Speakers & TVs section.
5. Find your HomePod name and tap it to connect.
6. Open your Apple Music app and play your favorite song.
On Mac:
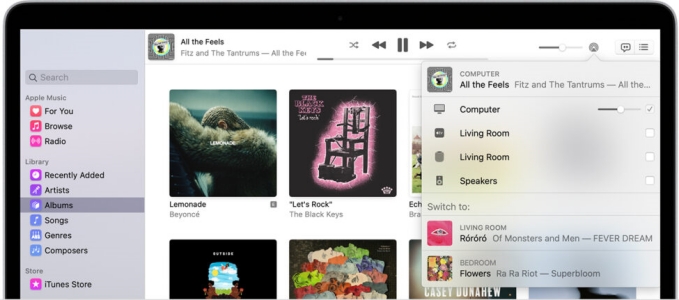
1. Open the Apple Music app on your Mac.
2. Choose a song, playlist, or album to play.
3. Click the AirPlay icon from the top right corner and click the checkbox as well.
4. Now the songs you played on Apple Music will be heard from the HomePod too.
Method 3. Listen to Apple Music on HomePod via Hand Off
The third method is to use the Hand Off feature. You can your family members can transfer the audio from your iPhone or iPod Touch to the HomePod. And it will start playing from the last time you left off.

Step 1. Open your Bluetooth and make sure your device and HomePod are under the same network.
Step 2. On your iPhone or iPod touch, go to Settings > General > AirPlay & Handoff and turn on Transfer to HomePod.
Step 3. Now hold your iPod touch or iPhone near the top of the HomePod.
Step 4. Then you’ll see a note appear on the screen of your phone that shows: “Transferring to HomePod”.
Step 5. Now you can play Apple Music out loud with your HomePod.
Part 2. How to Play Music on HomePod without iOS Devices
In the above discussion, we’ve talked about three ways to play Apple Music on HomePod. However, actually, they’re all for iOS users, what about the methods for other smartphone or device users? Don’t worry! I’m going to introduce in this part the method to stream Apple Music on HomePod without iOS devices.
To play Apple Music on HomePod on other devices, you will need a great Apple Music Converter – Tunelf Apple Music Converter. As the songs from Apple Music are encrypted with M4P, we need to remove the restrictions on Apple Music. Tunelf Apple Music Converter is here to help you.
Key Features of Tunelf Audio Converter
- Convert Apple Music to MP3, WAV, FLAC, AAC, and other audio formats
- Remove DRM from Apple Music, iTunes audios, and Audible audiobooks
- Preserve the converted audio with lossless audio quality and ID3 tags
- Support the conversion of audio format at a 30× faster speed in batch
Tunelf Apple Music Converter – Best Apple Music Converter
Tunelf Audio Converter is specially designed for Apple Music users. And it can deal with 3 types of audio files, including Apple Music, iTunes music, and Audible audiobooks. With Tunelf, you’re able to convert the M4P files to MP3 or other popular audio formats with lossless quality. You can also preserve the original ID3 tags for you to edit. And most importantly, the conversion will be conducted at a very fast 30× speed. With this efficient one-click solution, you’ll only need 3 simple steps to get the DRM-free Apple Music songs.
Step 1 Add Apple Music to the program
As Tunelf will be working with iTunes, please download and install the iTunes app on your device in advance. When you open Tunelf, the iTunes app will work at the same time. You can click the add icon on the top of the main screen, then you’ll enter your Apple Music library page. Just browse and select songs you want to load the files. Or you can just drag and drop the music track into the program.
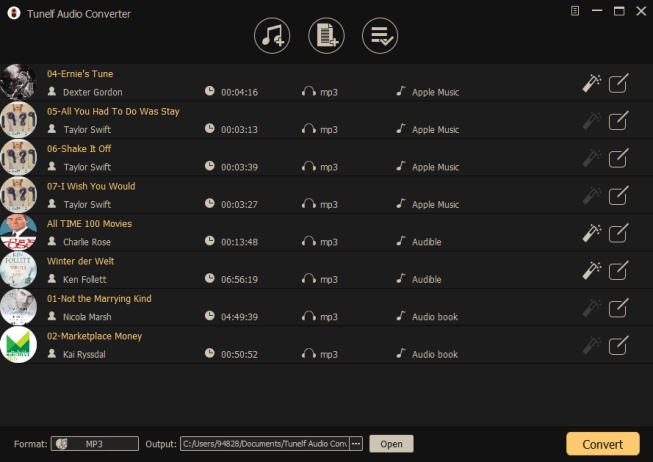
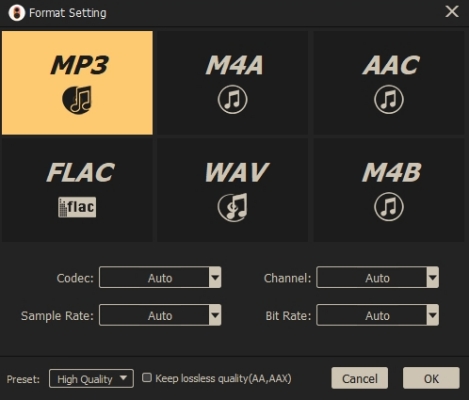
Step 2 Select output audio format and parameters
Now in this interface, you can click the “Format” panel and choose an output format from MP3, M4A, AAC, FLAC, WAV, or M4B according to your needs. We’ve set MP3 as default as it is compatible with many devices. And you can also customize the audio parameters like codec, channel, sample rate, bit rate, etc.
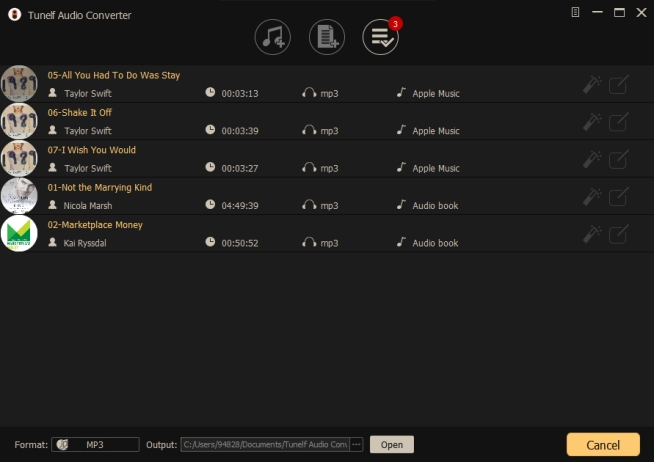
Step 3 Download Apple Music to DRM-free files
Now, you can click the Convert button to start your conversion. Once finished, you can click the Converted icon to check.
Step 4 Transfer Apple Music to iTunes for playing
After conversion, you’ll get the converted Apple Music files on your computer. Now you can transfer them to iTunes for offline listening.
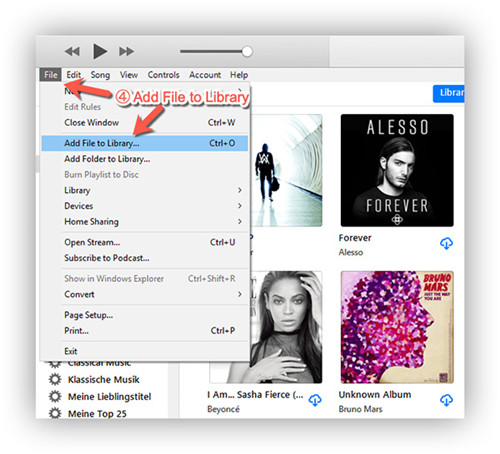
1. Launch the iTunes app on your computer.
2. Go to the File option and then select Add File to Library to upload the music tracks.
3. Select the converted Apple Music to upload.
When it is finished, you can play Apple Music on HomePod without iOS devices.
Final Thought
From the above discussion, it is obvious to learn that playing Apple Music on HomePod is not a tough task. And we also offer you the great alternative – Tunelf Apple Music Converter to download Apple Music offline. So that non-iOS users can listen to Apple songs on HomePod as well.
Get the product now:
Get the product now: