


Many people subscribe to Apple Music so that their Apple Music account is available on the iPhone, iPad, iPod touch, Mac, Android devices, and even Windows computers. And they would like to access Apple Music on multiple devices at the same time. However, recently many of them get the “You’ve Reached Your Device Limit. You have started to play Apple Music content on your other devices” message. Since there exists an Apple Music device limit, once you receive this message, it means that you cannot connect any additional device to your Apple Music account.
To solve this issue, you can manage your devices by removing the devices you no longer use, or signing out of your Apple Music account on unused devices to spare more free space for other devices. There are more solutions offered in this passage. Alternatively, you can download your Apple Music songs to your devices offline to bypass this issue. Get more information by reading the following content.

Part 1. What Is Apple Music Device Limit?
Apple Music does have a limit on the number of devices that can be connected to an Apple Music account at the same time. Each Apple Music account can be connected to up to 10 devices, which includes a combination of up to 5 computers and 5 mobile devices. If you receive the message “You’ve Reached Your Device Limit” when trying to access Apple Music on your device, it means you’ve reached the maximum number of devices to associate with your Apple Music account. To solve this issue, you may need to remove some of the devices that you no longer use to make room for new devices. To seek more solutions, please the following part.
Part 2. How to Fix Apple Music Reached Device Limit
Once you encounter the Apple Music reached device limit error, you can remove the unnecessary associated devices, such as your mobile devices or computer devices. Once you remove a device, you have the space to add a new device and won’t receive the message again. Now let’s take a look at how to bypass the Apple Music device limit reached issue step by step.
Method 1. Remove Associated Devices from Apple Music Account
If you have an Apple device such as an iPhone, iPad, or Mac, it’s very convenient for you to remove any devices that are connected with your Apple ID. Just follow the steps below to remove a device from your Apple Music account.
For iPhone/iPad:
Step 1. Go to the Settings app on your iPhone or iPad.
Step 2. Tap on your name and scroll down to view the list of devices that are connected to your Apple ID.
Step 3. Tap on the device you want to remove and choose Remove from Account.

For PC/Mac:
Step 1. Open iTunes on Windows or Apple Music on Mac
Step 2. For Windows, click Account and choose View My Account. For Mac, click Account and choose Account Settings.
Step 3. Scroll down to find the Downloads and Purchases option and click on Manage Devices.
Step 4. A list of devices associated with your Apple ID will be displayed, click Remove next to a device to remove it from your Apple ID.

Method 2. Log out of Apple Music Account on Unused Devices
If you no longer use a device that’s signed in with your Apple Music account, you may need to sign out of Apple Music on your device to spare more space for new devices.
For iPhone/iPad:
Step 1. Open the Settings app on your iPhone or iPad.
Step 2. Tap on your name and choose Media & Purchases.
Step 3. Select Sign Out.

For PC/Mac:
Step 1. Open iTunes on Windows or Apple Music on Mac.
Step 2. Click Account and choose Sign Out.

Method 3. Deauthorize Your Computers for Apple Music
As we mentioned in the content above, an Apple ID can be connected to up to 10 devices, including 5 computers and 5 mobile devices. Thus, if you already have five authorized computers and want to authorize a new computer for Apple Music, you have to deauthorize one of them. Here’s how to deauthorize your computer:
Step 1. Open the iTunes on Windows or Apple Music on Mac.
Step 2. For Windows, click Account and choose View My Account. For Mac, click Account and choose Account Settings.
Step 3. Sign in with your Apple ID and password.
Step 4. At your Account Information page, click Deauthorize All under Apple ID Summary.

Method 4. Upgrade to Apple Music Family Subscription
Apple Music has different subscription tiers that allow you to connect to devices. If you have reached your Apple Music device limit when you’re on your individual subscription plan, consider upgrading to a Family plan, which allows you and your family members for more connected devices. Additionally, once you use the Apple Music Family Sharing function, each member of Apple Music Family Sharing can enjoy unlimited access to Apple Music on their devices. Here’s how to upgrade your Apple Music to a Family subscription.

Have you always shared your favorite music with your family members and friends? If your answer is yes, then this post will interest you. In this post, we’ll tell some details about how to share Apple Music without Family Sharing.
For iPhone/iPad:
Step 1. Open the Settings app on your iPhone or iPad.
Step 2. Tap your name and choose Subscriptions.
Step 3. Tap Apple Music and Choose See All Plans.
Step 4. Choose Family Plan and follow the on-screen instructions to complete your purchase.

For Mac:
Step 1. Open the App Store app on your Mac.
Step 2. Click your name in the side menu bar.
Step 3. Click Account Settings, and you may be asked to sign in.
Step 4. Scroll to Subscriptions and click Manage.
Step 5. Click Edit next to the Apple Music subscription you want to change.
Step 6. Choose the Family Plan option.

For Windows:
Step 1. Open the iTunes app on your Windows.
Step 2. Click Account and choose View My Account.
Step 3. Sign in with your Apple ID and password.
Step 4. Scroll to Subscriptions under Settings and click Manage.
Step 5. Choose the Family Plan option and follow the on-screen instructions to switch your subscription plan.

Method 5. Uninstall and Reinstall the Apple Music App
The final solution to this problem is to try uninstalling and reinstalling the Apple Music app. This operation will refresh some information on Apple Music. Those removed devices will no longer appear in your Apple Music account, which can solve the problem of reaching the Apple Music device limit to add new connected devices.
Part 3. Best Way to Bypass Apple Music Device Limit
Apple Music reached device limit issue may occur once in a while. Thus, you may have to remove unused devices frequently, which would be very inconvenient. To avoid receiving the “You’ve Reached Your Device Limit” message again, we would highly recommend the Tunelf Audio Converter to break the Apple Music device limitations.
This is an Apple Music Converter, which can break the DRM restriction of Apple Music. It allows you to convert your Apple Music songs, playlists, and albums to MP3, AAC, FLAC, WAV, M4A and M4B formats. Once you convert your Apple Music tracks with Tunelf, the tracks will be saved as local files on your computer. Therefore, you can upload them to any device for shuffle play. You don’t need to worry about the device limitation issue anymore. What’s more, it supports converting music at 30× faster speed and keeps lossless audio quality. With Tunelf Audio Converter, you can easily customize the parameters of the output audio, such as bit rate, sample rate, and channel. Now, let’s see how to use this tool.
Key Features of Tunelf Audio Converter
- Convert Apple Music to MP3, WAV, FLAC, AAC, and other audio formats
- Remove DRM from Apple Music, iTunes audios, and Audible audiobooks
- Preserve the converted audio with lossless audio quality and ID3 tags
- Support the conversion of audio format at a 30× faster speed in batch
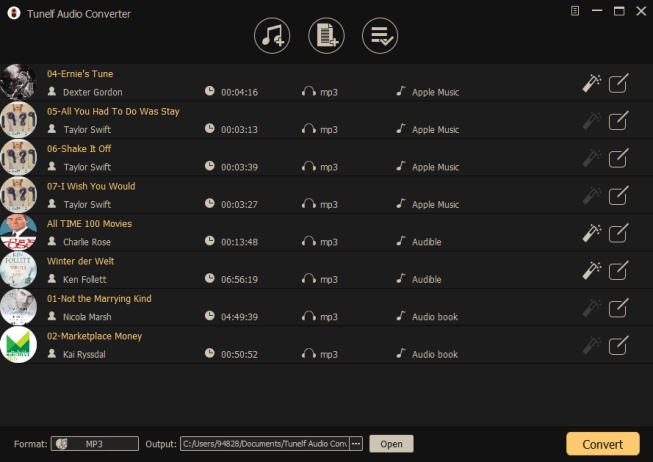
Step 1 Import Apple Music to Tunelf
First of all, launch the Tunelf Audio Converter on your computer, and click on the Load iTunes Library icon on the screen. Then, all your downloaded Apple Music songs will be presented in Tunelf. Choose the downloaded songs you want and tap the Add icon to add them to the conversion list. Or simply drag and drop the songs from Apple Music to Tunelf.
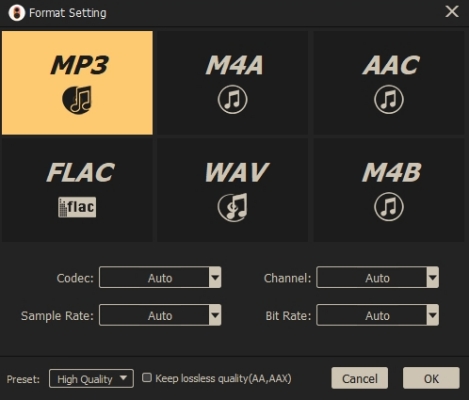
Step 2 Set Output Parameters for Apple Music
Once your target songs are loaded, click the Edit button to edit the ID3 information of the songs, such as title, album, genre, etc. Then click the Format panel on the left corner, and choose the output format you like. Other parameters like sample rate, channel, and bit rate can also be customized in this part. Click OK to save all your settings.
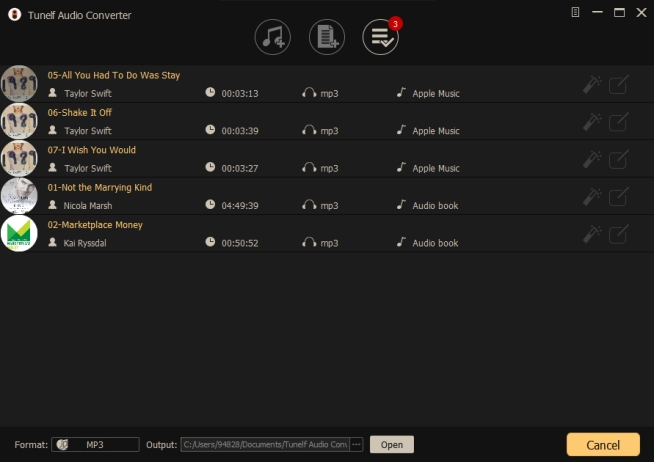
Step 3 Start Converting Apple Music
After all the settings are done, click the Convert button at the bottom of the screen. Wait for a little while, and all the added songs will be converted to MP3 as local files. Now, you can browse all converted Apple Music songs by clicking on the Converted button. You can upload your downloaded Apple Music songs to any device.
Part 4. Conclusion
Apple Music has the limit to associate with up to 10 devices with the same Apple ID. Once you exceed this limit, you will not be able to use your Apple Music on new devices. To fix this error, you can apply the methods we offered in the passage. Additionally, you can use the Tunelf Audio Converter to remove the Apple Music device limit. With Tunelf, you can convert your downloaded Apple Music songs to your device, and upload them to multiple devices for offline listening. Hope you have a smooth and joyful Apple Music experience with Tunelf.
Get the product now:
Get the product now: