


One of the best features of Apple Music is that it allows you to easily create a queue of songs that you want to listen to next. This feature offers you a chance to customize your listening experience. Creating a queue on Apple Music is quite simple, just take a few steps, and you can enjoy the queue created by yourself. In a queue, you can add songs, albums, and playlists, and reorder them as you like. The queue feature ensures you tailor your listening experience to your preferences. Now, let’s discover how to queue songs on Apple Music.

Part 1. How to Queue Songs on Apple Music
Apple Music is an excellent music streaming service for music, podcasts, and music videos. Playing songs on Apple Music according to your listening preferences must be an enjoyable thing. In this part, we’ll discuss how to queue songs on Apple Music. Follow the guide below and find your answer.

Nothing is more bothered than Spotify Queue not showing or working. This post will focus on the reason why Spotify Queue not showing and provide some effective solutions for you.
1.1 Queue Songs in Apple Music on iPhone
Step 1 Open Apple Music on your iPhone and open a playlist.
Step 2 Play a song as you like.
Step 3 Tap to open the Now Playing page.
Step 4 Tap the Playing List icon on the bottom right.
Step 5 Under Playing Next, you can press and hold the three horizontal lines next to a song and drag it to reorder the song.

1.2 Queue Songs in Apple Music on Mac
Step 1 Open Apple Music on your Mac and play a song.
Step 2 Go to your Library and choose a song you want to listen to.
Step 3 Tap the three-dot icon next to a song, and choose Play Next.
Step 4 Click the Playing Next button right near the now playing bar. You can drag the songs into the order you want.
Step 5 Click the Playing Next button again to close the queue.

1.3 Queue Songs in Apple Music on Windows
Step 1 Open iTunes on your Windows and play a song.
Step 2 Click the Playing Next button, and choose Playing Next, then double click a song to play it and the songs that follow.
Step 3 You can drag the songs into the desired order.
Step 4 Click the Playing Next button again to close the queue.

Part 2. How to Manage Your Queue on Apple Music
After adding a queue on your Apple Music, you can now try to manage it as you want. Whether you want to add music to a queue, remove songs from your queue, or reorder songs in your queue, you can achieve it with simple steps.
How to Clear Queue on Apple Music
On your iPhone, you have to remove songs one by one manually. While on Mac or Windows, just select the Clear button at the top of the queue, you can remove all songs in your Apple Music queue at once.
How to Add Music to Queue on Apple Music
To add songs to the queue on Apple Music, you can click the More option near your wanted song, and choose Play Next. Then, your wanted song will be added to your Apple Music queue successfully.
How to Reorder Songs in Your Queue on Apple Music
In Apple Music, you can rearrange the order of the queue according to your preferences. To reorder the song in the queue, just press and hold the songs to drag it to the location you want.
Part 3. Best Way to Download Apple Music Queue to MP3
Do you want to keep listening to your purchased Apple Music songs even if your subscription has expired? I’m gonna introduce the best way to keep your Apple Music songs as MP3. Here is the way – use Tunelf Audio Converter. As we all know, tracks on music streaming services are well preserved by encrypted audio formats, and Apple Music is no exception. To download Apple Music songs as MP3, you have to remove the DRM protection first. Let’s see what Tunelf is.
As its name implies, Tunelf Audio Converter is designed to convert Apple Music audios, including songs, playlists, albums, and podcasts. It supports MP3, AAC, FLAC, WAV, M4B, and M4A formats to convert. No need to worry about the converted audio quality, it is lossless and keeps the 100% original sound. With 30X faster conversion speed, all your added songs will be converted in a few minutes. Additionally, you can adjust other parameters like sample rate, bit rate, and channel. After conversion, you can get your purchased Apple Music songs in MP3 format permanently. Then, you can easily upload your converted songs to any player or device for offline listening. Here’s how to use this tool:
Key Features of Tunelf Audio Converter
- Convert Apple Music to MP3, WAV, FLAC, AAC, and other audio formats
- Remove DRM from Apple Music, iTunes audios, and Audible audiobooks
- Preserve the converted audio with lossless audio quality and ID3 tags
- Support the conversion of audio format at a 30× faster speed in batch
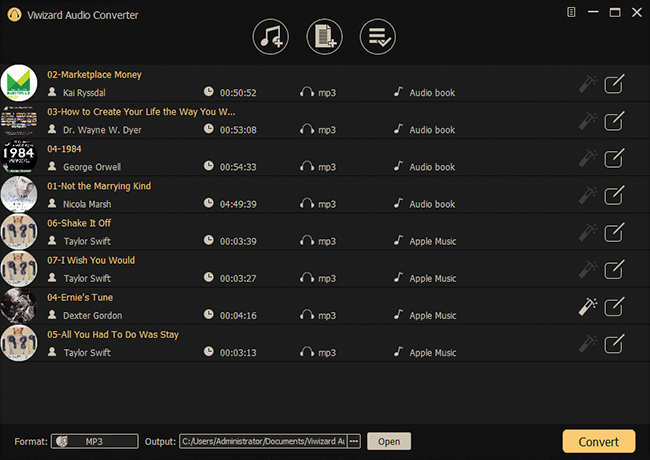
Step 1 Load Apple Music Songs to Tunelf
Launch the Tunelf Audio Converter, and the Apple Music app will launch automatically on your computer. Click the Load iTunes Library icon in the upper of the panel. Then your downloaded Apple Music songs will be present. Choose your desired songs and tap the Add icon to add the songs to the conversion list. Simply drag and drop the Songs to Tunelf is also workable.
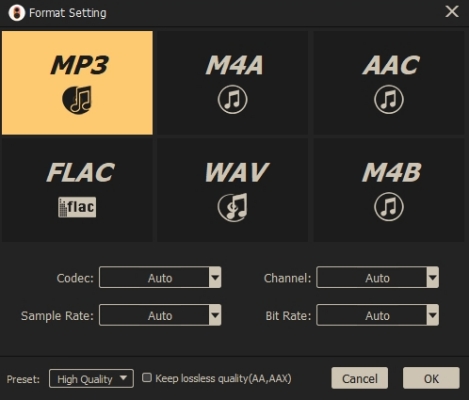
Step 2 Adjust Parameters for Apple Music Songs
Once all your wanted songs are loaded to Tunelf, click the Format icon in the bottom left to choose the output format from as MP3. You can click the Edit icon to change the title, album, and genre of the songs. Moreover, you can adjust parameters like codec, channel, sample rate, and bit rate. Finally, click OK to save all the parameter settings.
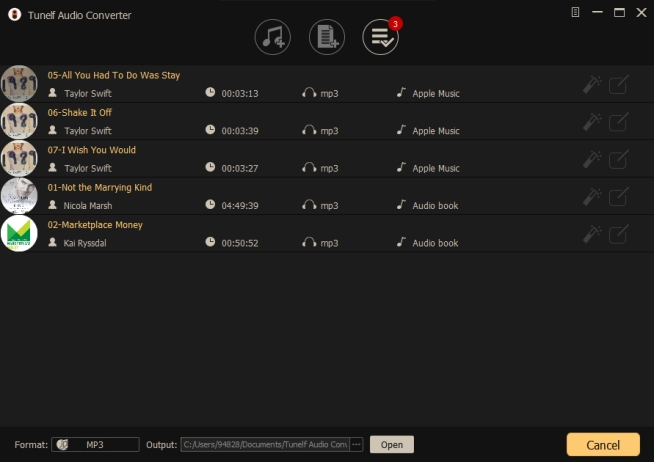
Step 3 Start Converting Apple Music Songs to MP3
After all the settings are finished, click the Convert button on the bottom right corner of Tunelf. Wait for a few seconds, then your Apple Music songs will be converted to MP3. Now, you can browse all converted songs by clicking the Converted option. You can upload and listen to your converted Apple Music on any device now.
Part 4. Troubleshooting: Apple Music Queue Not Working
Sometimes, many users may encounter the situation of the Apple Music queue not working properly. It may caused by a variety of reasons, like bugs in the Apple Music app or your device, poor internet connection, etc. In this case, we can solve the issue from the following aspects:
Change to a Better Internet Connection
Any online operation on Apple Music requires a stable and reliable internet connection. If your internet connection tends to be unreliable or unstable, then change to another one. Or off and on the Airplane Mode to refresh your internet condition.
Upgrade Apple Music and Device
Sometimes, many problems are caused by an outdated app or operation system. If you want to get rid of unpredictable issues when using Apple Music, then update your Apple Music app and device to the latest version.
Remake a Queue on Apple Music
The most common and direct way is to remake a queue on Apple Music. Maybe there is a bug when you create the queue at first, so try one more time, and the issue may be solved.
Reinstall the Apple Music App
Have you tried the methods yet? If you have tried all of them, but still not working, then try uninstalling and reinstalling Apple Music to start Apple Music fresh and delete all the previous data and settings.
Part 5. Conclusion
In this post, we list how to queue songs on Apple Music with iPhone, Mac, and Windows. Have you got it now? The queue feature allows you to play songs on Apple Music according to your listening preferences. Additionally, we recommend the Tunelf Audio Converter to you. With Tunelf, you can easily convert your purchased Apple Music songs into MP3 format, and listen to your converted songs on any device. Hope you enjoy your journey on Apple Music.
Get the product now:
Get the product now: