

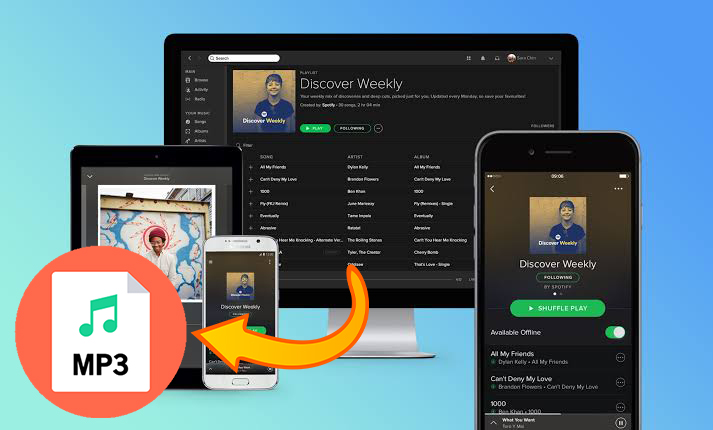
As the king in streaming music, Spotify attracts more and more people from around the world to enjoy perfect music playback. With a catalog of over 80 million songs, you can find various music resources on Spotify with ease. However, there still exists a limitation that you cannot listen to your favorite tunes on non-Spotify-enabled devices.
Therefore, the best method is to record music from Spotify and save it to your device so as to play Spotify on more devices like MP3 players. When recording music from Spotify, you’ll need to first decide the app you use. Look no further! You can choose to record Spotify with Audacity which is a completely free recording tool.
Part 1. Audacity App Review
Audacity is a free open-source and cross-platform audio software that allows you to record and edit audio on Windows, Mac, and Linux computers. You can use it to record any audio playing on your computer, including audio from various streaming music platforms like Spotify. Audacity also supports users in making deep audio analyses by visualizing frequencies in its Spectogram view or using scientific Vamp analyzers to make discoveries. Once everything is ready, the recording can be saved in the format of MP3, WAV, FLAC, OGG, and much more.
Note
Although Audacity is free to use, if you are a Spotify Free user, recording Spotify with Audacity will also record the disturbing ads. So we recommend its best alternative which can record and download Spotify music losslessly without Premium. You can check more detailed information on Part 3.
Is Audacity Safe?
Yes. Audacity is safe to download and install on your desktop computer if it has been downloaded directly from the Audacity website. Furthermore, Audacity keeps software updates regularly so you can experience the latest features.
Pros
- Completely free
- Support multitrack audio
- Support editing and trimming audio
Cons
- Not best for Spotify Free users
- Cumbersome interface
- A little complex to use
- Unable to retain ID3 tags and lossless quality
- Record songs one-by-one
Part 2. How to Record Spotify with Audacity on PC/Mac
After having a deep understanding of Audacity, let’s make it function to get Audacity Spotify to MP3. Go to the Audacity official site to install the right version of Audacity on your computer depending on its OS. Here’s how to record Spotify with Audacity.
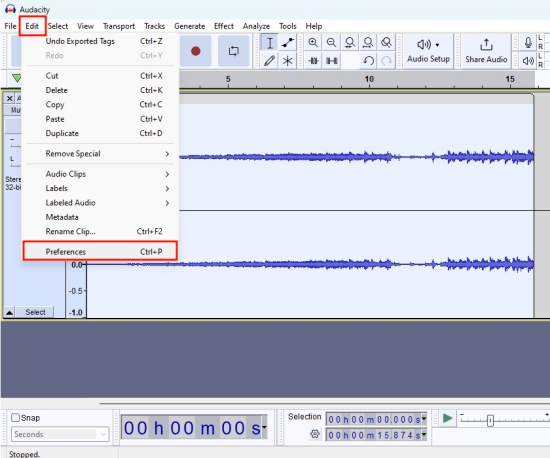
Step 1. Set Up Audacity to Capture Audio from the Computer
Before recording music tracks from Spotify, you need to set up Audacity on your computer first, being dependent on your computer operating system and audio interface.
1. Launch Audacity on your computer and click Edit from the top menu bar.
2. Select Preferences from the dropdown menu.
3. Within the Audio Settings section, unfold the Host menu and select Windows WASAPI.
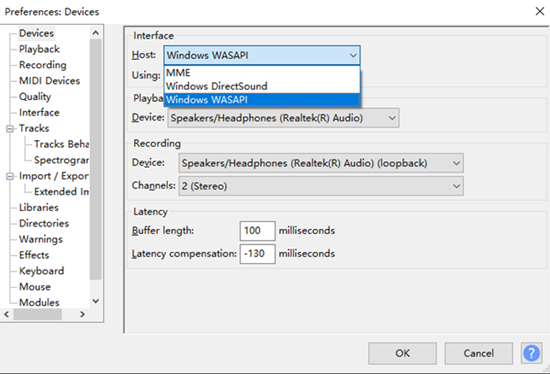
4. Then select the device you’re using to listen as the input. Here I use headphones, so select Headphones. If you are using a speaker, then choose Speakers.
5. Click OK to save your preferences.
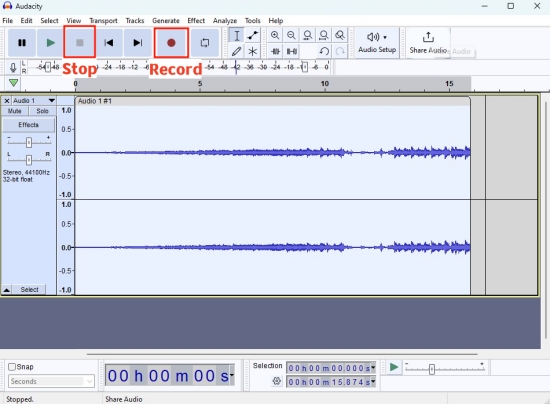
Step 2. Start Recording Spotify with Audacity
After setting up, it is time to record Spotify to MP3 with Audacity if you don’t know how to import songs from Spotify to Audacity.
1. Run and play Spotify in the background.
2. Click the red Record button and Audacity will capture real-time sound from your computer.
3. To stop the Spotify recording, just click the square icon which means Stop.
Step 3. Edit and Trim the Recording
Before saving the Spotify recording, you may find there is silence on your recording or two songs mixed together. So you have to trim the whole recording into each Spotify song.

Why not find songs you like from Spotify for cutting? In this post, we’re going to introduce how to cut music from Spotify.
1. Hit on Selection Tool or you can press the F1 key.
2. Select the duration that you want to remove from your recording and press the Delete key.

3. After trimming the audio to your wanted part, you can click Effect to add some effects to this audio, like fade-in, crossfade, and much more.

Step 4. Save and Export Audacity Spotify to MP3
Then you could choose to save the recorded Spotify songs to your computer in your required format directly.
1. Select onetrack audio and click File > Export > Export as MP3.

2. On the pop-up window, pick the output location, name this audio, select the audio quality, and set the bit rate mode.

3. When all is done, click Save and Audacity will let you edit metadata tags for this audio file.
4. Click OK and you can now locate it in the directory you set before.

Part 3. Best Alternative to Audacity: Tunelf Spotify Music Converter
As stated above, Audacity records songs from Spotify Free while containing irremovable ads. In this case, Tunelf Spotify Music Converter is the best alternative tool to help both Spotify Free and Premium users download Spotify songs without ads. Moreover, Tunelf also supports you export Spotify music to MP3, FLAC, WAV, M4A, AAC, and M4B.
As a professional-grade and uber-popular music converter, Tunelf provides 5x faster speed and batch conversion so you can save time on recording. Rather than recording Spotify songs with Audacity one by one, why not let Tunelf handle multiple processes at one click? Furthermore, using Tunelf Spotify Music Converter, you can save Spotify songs with lossless quality and original ID3 tags. This tool is more convenient in every aspect than Audacity.
Key Features of Tunelf Spotify Music Converter
- Download Spotify playlists, songs, and albums with free accounts easily
- Convert Spotify music to MP3, WAV, FLAC, and other audio formats
- Keep Spotify music tracks with lossless audio quality and ID3 tags
- Remove ads and DRM protection from Spotify music at a 5× faster speed
Step 1 Import Spotify music to Tunelf
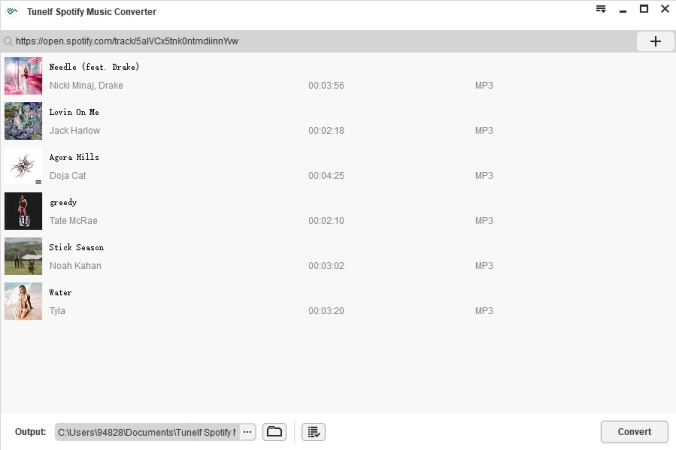
After installing Tunelf Spotify Music Converter to your computer, launch it on your computer then it will instantly load the Spotify app. Navigate to the Spotify song that you want to rip. Then copy the URL of the track or playlist from Spotify and paste it to the search bar on the Tunelf application then click the + icon to add music. You can also drag and drop songs from Spotify to the interface of the Tunelf application.
Step 2 Set the output parameter for Spotify music
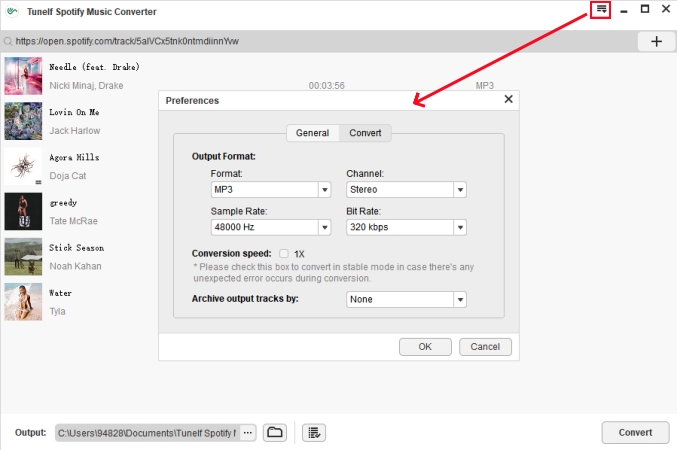
Once you have added Spotify songs you want to download to Tunelf Spotify Music Converter, all you have to do is set the output parameters. Click the menu bar and choose the Preferences option then Convert. Here you could adjust the output format, bit rate, sample rate, and channel. By default, Tunelf works at a 5x speed. If you want a more stable conversion, just check the 1x box.
Step 3 Start to download music from Spotify to MP3
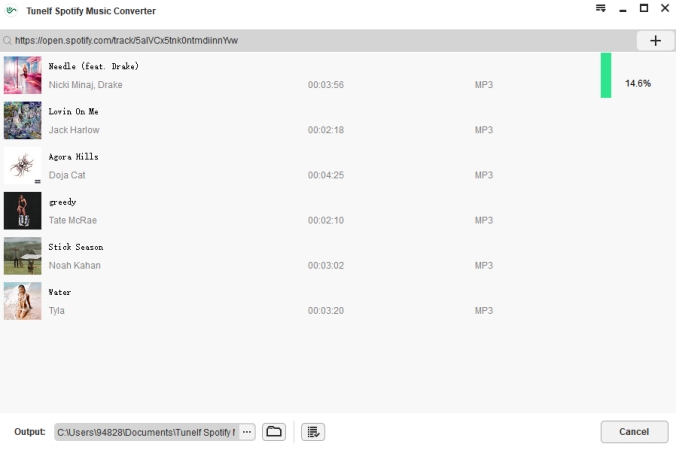
After all the settings have complied with your requirements, the app will start to download and convert music from Spotify to the default folder or your specific folder by clicking the Convert button. Tunelf app finishes the downloading of Spotify tracks and you can go to browse the converted Spotify songs. To locate the converted Spotify music files, just click the Converted icon and the converted list will appear.
Part 4. Comparison Table: Audacity VS Tunelf
Although both Audacity and Tunelf applications can record music from Spotify, there also exists a huge difference between them. Audacity is an audio recorder for recording computer playback while Tunelf Spotify Music Converter is a professional Spotify music downloading and converting tool. And more, see the complete list of differences between them.
| Tunelf Spotibeat Music Converter | Audacity | |
| Supported OS | Windows & Mac | Wins, Mac, Linux |
| Output Formats | MP3, FLAC, WAV, M4A, AAC, M4B | MP3, WAV, FLAC, AIFF, AU, Ogg |
| Recording Speed | 5x | 1x |
| Lossless Quality | ✔ | ✘ |
| ID3 Tags | ✔ | ✘(Need to add metadata tags manually) |
| Batch Processing | ✔ | ✘ |
| Simplicity | ⭐⭐⭐⭐⭐ | ⭐⭐⭐ |
| Best For | Both Spotify Premium and Free users | Spotify Premium users only as it can record ads from Spotify Free |
Part 5. FAQs about Audacity Spotify
Q1: Why do we need to record Spotify music?
A: As we all know, Spotify is a music streaming service and requires a premium subscription to access the offline feature. And it only offers you the encrypted music files that can not be played out of the Spotify app. Thus, if you get full control over the music you like or want to play it on other apps or devices, recording music can be a good choice. Also, the Tunelf Spotify Music Converter is an effective helper.
Q2: Is it legal to record music from Spotify?
A: Yes. As long as you record music only for personal use, it’s legal to record music form a music streaming service.
Q3: What app can record Spotify on your phone?
A: If you are using an Android device, you can try the Syncios Audio Recorder. It can help you capture any sound on your mobile phone, including Spotify music. And you can save the recording in MP3 format.
Q4: How to record Spotify to MP3?
A: Audacity allows you to record Spotify music and export the recording as an MP3 file. The Tunelf Spotify Music Converter can help you directly download Spotify music in MP3 format just with one click.
Want to download Spotify songs to MP3 on your computer or mobile phone? Here we’ll offer several ways to help you convert Spotify to MP3.
Conclusion
Audacity lets you record music from Spotify for free on your computer. By reading the post, how to record from Spotify to Audacity will not be a problem. However, if you’d rather download a dedicated app for your Spotify audio-ripping needs, Tunelf Spotify Music Converter could be a good option for you. With this service, you can convert Spotify music from an encrypted format to several popular formats. And it offers the ability to download any Spotify content to your computer no matter you are a Spotify Free user or not.
Get this product now:
Get this product now: