


There are various streaming services around the online market. Admittedly, Tidal remains unparallel for its high bitrate sound quality. In 2023, Tidal announced the new Live on Tidal feature. Similar to Spotify’s Group Session, Tidal Live Session makes it easier to share your favorite Tidal songs with your friends. Whenever you want to listen to a new album or podcast with your long-distance friends or family members, Tidal Live Session meets your needs. This cool feature not only powers moment through sharing music but brings people together. Thus, scroll down to learn how to start and make use of the Tidal Live Session.

Note
Live Session is only available for HiFi and HiFi Plus subscribers on the Tidal mobile app.
Part 1. What Is Tidal Live Session?
Tidal Live was formerly beta tested as “DJ” through an early access program, but Tidal developers have updated and revamped it since April 2023. Hence currently, Tidal Live Session is a new way for subscribers to spontaneously share music with others. With Tidal Live Session, you can easily discover and enjoy tracks with others in real time.
To enable and join Tidal Live Session, there are some requirements:
- There is a 3-hour duration limit for Tidal Live Session.
- A HiFi or HiFi Plus subscription is required whether you’re a starter or listener.
- The starter and listener should be in the same region.
- Paid subscribers in the US and Canada can listen to Live sessions in either country.
- Tracks in Dolby Atmos or the Sony 360 Reality format, listeners will not be able to hear the song being played in the Live Session on Tidal.
Part 2. How to Use Tidal Live Session
After figuring out what is Tidal Live Session, now grab your iOS or Android device to launch or join a session on Tidal. Here we will introduce how to.
2.1 How to Enable the Tidal Live Session Feature

Before going to start a Live Session on Tidal, please enable this feature first. Go to Tidal Settings and select My content under the Account section. From here, you can feel free to turn on or turn off the Tidal Live Session.
2.2 How to Start A Tidal Live Session on Mobile

1) Open the Tidal app on your Android or iOS device.
2) Pick any song you want to share and tap it to start playing.
3) Open the players and tap the Live icon at the top right corner.
4) On the new pop-up page, hit on Name your session to give it a unique name.
5) After entering and saving the Session name, select Copy session link. Once the link is copied successfully, it will show a green tick and say ‘Session link copied‘.
6) Tap Go to Live to start your Live Session Tidal.
7) Once you start a Live Session on Tidal, you are allowed to share it with others by tapping the share button and then Share live session.
During the Session, you are free to review, edit, and add to your queue by using the list icon in the bottom left corner. Unlike the Spotify Group Session, Tidal only enables starters to control and manage the playback.
2.3 How to End A Tidal Live Session

1) To end your Tidal Live Session, just hit on the cross button in the top right corner.
2) It will open a new box that provides two options for you: End now or End after this track.
3) Once you choose to end, listeners in your Live Session can’t access your shared tracks anymore.
Part 3. Best Way to Share Tidal with Others
Although Tidal Live Session is ideal for sharing music, this is only available during the subscription. Once the subscription is canceled or expired, it is hard to enjoy music with your loved ones. Moreover, if the one you shared with hasn’t subscribed to the Tidal premium plan, the Live Session he can’t join which also leads to the same result. So here we’d like to introduce a workaround to help you share Tidal music without limitations.
To share Tidal songs with others, the best way is to download Tidal songs as local files. Functioning as a powerful Tidal Music downloader, Tunelf Tidal Music Converter can download and convert tracks from Tidal to MP3, FLAC, AAC, M4A, M4B, and WAV. With its help, you can save all Tidal songs to your computer locally and then share Tidal MP3 songs with absolute ease. In the conversion, Tunelf Tidal Music Converter can remove DRM from Tidal as it adopts an advanced decryption technology. After conversion, you won’t need to worry about any loss of audio quality and ID3 tag.
Key Features of Tunelf Tidal Music Converter
- Download any Tidal content, including songs, albums, playlists, and artists
- Support exporting Tidal music to MP3, AAC, FLAC, WAV, M4A, and M4B
- Preserve a whole set of ID3 tag information in the downloaded Tidal songs
- Handle the conversion of Tidal music up to 5× faster speed and in batch
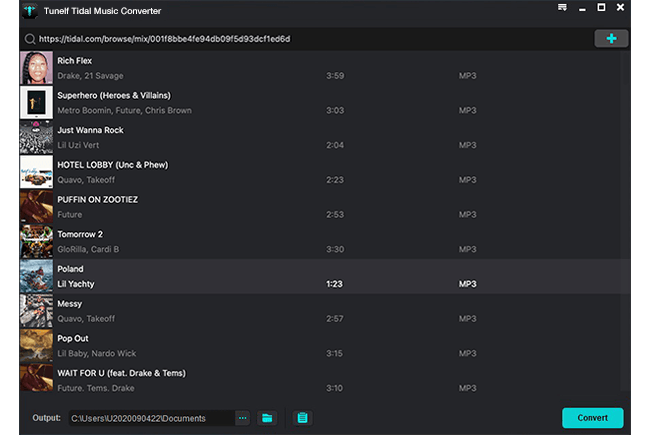
Step 1 Add Tracks from Tidal to Tunelf
Install and start Tunelf Tidal Music Converter on your Windows or Mac, and the Tidal app will be launched or relaunched for a connection. So make sure you’ve downloaded the Tidal app and signed into your valid account. Find your desired track or playlist on Tidal and share it to obtain the link. After that, copy and paste it into Tunelf’s search bar and click the + button. Once uploaded, you can freely browse your songs in Tunelf.

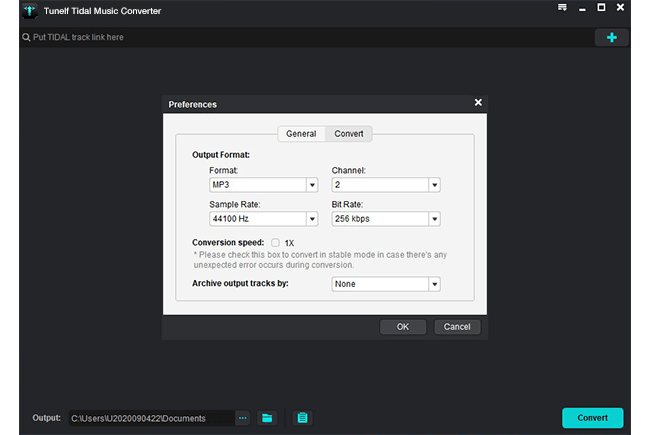
Step 2 Adjust the Output Parameters for Tidal Music
Now, click the menu icon in the upper right corner and select the Preferences option. On the new pop-up window, switch to the Convert section. From here, you can change the output format, bit rate, sample rate, and channel as you want. To share with others, just leave the MP3 format as the default option. If you make other adjustments, click OK before exiting the window.
Step 3 Download Tidal Music as Local Files
Just click the Convert button at the bottom right corner, and Tunelf will automatically download and convert Tidal songs to MP3 at a 5x faster speed. After conversion, all the Tidal songs will be saved to your computer. You can navigate to the Converted list to browse all your converted songs or use the search icon to locate them in the local folder.
Step 4 Share Tidal Music for Listening Together
After finding converted and playable songs on your computer, you can drag and drop them to any chat window to share them with your friends or on social media platforms. Even though the target people have a Tidal subscription or not, they can access and listen to what you share.
Conclusion
Thanks to Tidal Live Session, it is just a matter of tapping a few buttons to achieve sharing music. And it won’t take long to reap the benefits of listening to music with others in real-time. However, it also exists some restrictions, such as a subscription being required, the people in Live Session must in the same country, and more. Therefore, the best way to share Tidal songs is to download Tidal Music locally by using Tunelf Tidal Music Converter. After that, feel free to share your favorite Tidal songs with anyone, anywhere and anytime.
Get the product now:
Get the product now: