


Amazon Music not only is a great place that boasts over 100 million mixes to stream but functions as a database to process your listening history and recommend something based on your preference. After using Amazon Music to stream what you liked and discovered, you can quickly access your recently played tunes in the Recently Played section. While a few newcomers to Amazon Music may have no idea about Amazon Music history and often ask “How do I find my Amazon Music history?” If you are at a loss and want to hide or clear Amazon Music history, you can’t miss this passage to get a step-by-step tutorial.
Part 1. How to Clear Amazon Music Listening History
To clear Amazon Music song history, you have two options: delete song history Amazon Music directly or clear Amazon Music caches thoroughly. Today’s tutorial mainly focuses on how to clear Amazon Music history, so check the following steps.
Step 1. How to Find Song History on Amazon Music
1. Open the Amazon Music app on your mobile or desktop.
2. Head to Library and you will see the Recents tab from the top.
3. On this page, you can find Recently Played and Song History. On the desktop app, click the SEE ALL button to open the Amazon Music full history.

Step 2. How to Clear Song History on Amazon Music
1. Stay on the Recents page, and select the song, playlist, or album you want to clear from Amazon Music history.
2. Hit on the three dots icon beside each song and select the option ‘Remove from history‘. After you choose this, it will disappear immediately.

Note
There is no option to delete the Amazon Music full history unless clear Amazon Music caches. However, once you choose to delete Amazon Music caches and data, all downloaded tracks will be removed from your device.
Part 2. How to Clear Amazon Music Search History
When you type your wanted song on the Amazon Music search bar, it will leave a mark. To protect your privacy, you may try to delete the Amazon Music search history after each search. Here’s how to clear search history on Amazon Music.
1. Go to the Amazon Music website or the Amazon Music app.
2. Navigate the search area.
3. Under the search bar, you can see your Amazon Music search history.
4. Hit on the cross icon and it will delete all search history at once.

Part 3. How to Clear Amazon Music Browsing History
We understand that some Amazon Music listeners prefer purchasing and owning Amazon MP3 music for listening rather than streaming it. It is convenient to browse and buy Amazon MP3 Music on amazon.com. Although anyone can‘t delete Amazon Music purchase history including digital orders, here we teach you how to delete Amazon Music history when you browsing Amazon Music digital items.
1. Go to the Amazon Browsing History page from a browser.
2. Select Your Browsing History and you can see all the items including digital music.
3. Click on Remove from view. Once the Removed option displays, it shows you’ve deleted it.

Another quick way is to click Manage History at the rightmost and then Remove all items from view > Remove. All items displayed on the Browsing History will be cleared. Of course, you can toggle the slider ‘Turn Browsing History on/off‘ to disable any browsing history on your current account.

Part 4. How to Listen to Amazon Music without the App
As we said in Part 1, it is a matter of clicking or tapping a few buttons to clear Amazon Music song history. However, it’s really time-consuming to clear Amazon Music full history by deleting each recently played song one by one. Given that you still want to clear the full history and aren’t willing to leak your listening privacy and habits, we suggest you play Amazon Music without the app, leaving no trace. However, without removing the DRM protection of Amazon Music, you can’t listen to Amazon Music on other players or devices.
So here Tunelf Amatune Music Converter comes here to help you to remove DRM and save your preferred Amazon Music songs to several widely-supported audio formats, such as MP3, AAC, WAV, FLAC, M4A, and M4B. Embedded with an ID3 tags identification technology, this smart converter can save all Amazon Music songs with the original metadata information and audio quality. More surprisingly, it is easy to manage and clear your full history on the Converted list after conversion. It works at a 5x faster speed so you can convert a dozen of tracks in a few minutes. Let’s see how to use this Amazon Music converter.

Key Features of Tunelf Amazon Music Converter
- Download songs from Amazon Music Prime, Music Unlimited, and HD Music
- Convert Amazon Music songs to MP3, AAC, FLAC, WAV, M4A, and M4B
- Handle the audio conversion of Amazon Music at a faster speed of 5×
- Ensure the output audio quality while retaining ID3 tags and metadata
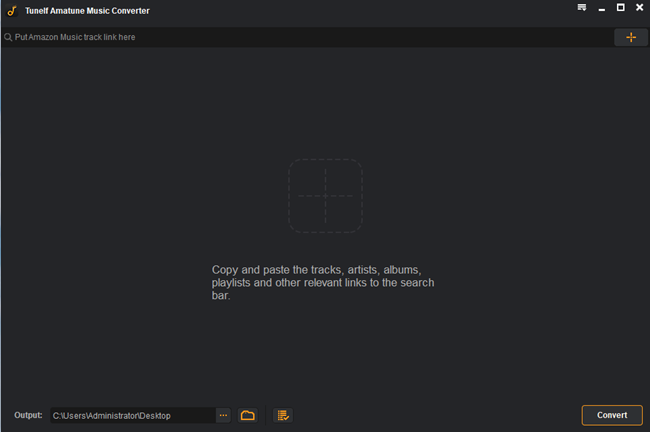
Step 1 Add songs from Amazon Music to Tunelf
Install and open Tunelf Amazon Music Converter, Amazon Music will be launched automatically. Now, share the song to obtain the URL link of a track, playlist, album, or artist on Amazon Music, and copy it to Tunelf’s search bar. After that, click the + icon to proceed with the uploading process. You can also add Amazon Music files to the Tunelf software by dragging and dropping.
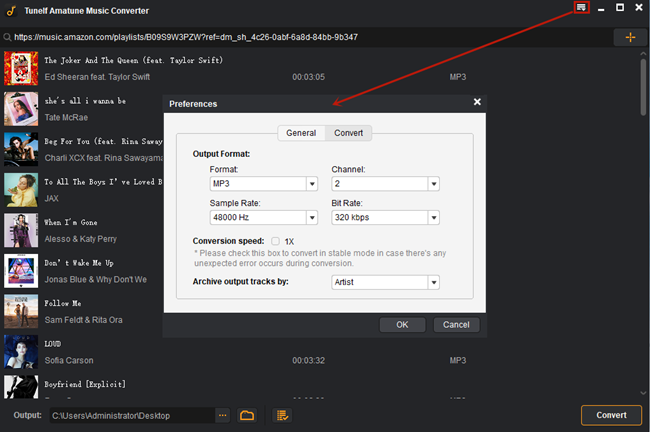
Step 2 Adjust output audio preferences
Before converting, you have the freedom to customize the output format, channel, bit rate, and sample rate. Click the Menu icon featuring three lines at the top-right corner. Then select Preference and turn to the Convert section to change the output format to MP3. Don’t forget to click OK to save your settings. Moreover, you are able to click the Output panel to change the output location.
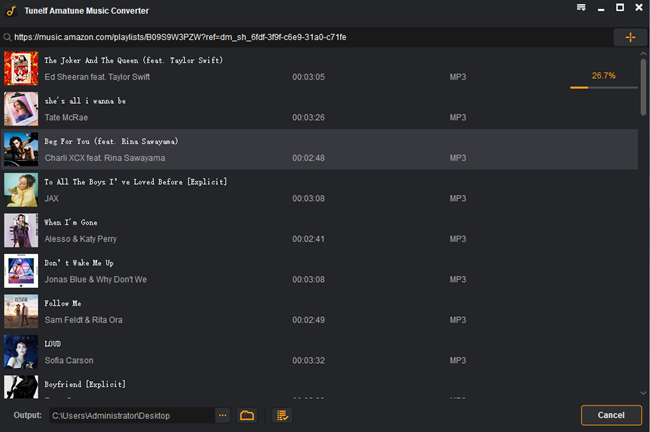
Step 3 Download and save Amazon Music locally
After selecting the songs you want to export and share, click the Convert button to start the conversion. Once done, all selected Amazon Music songs are saved to your computer. To browse all the downloaded Amazon songs, go to the Converted page at the bottom. And select Delete all and then Move files to clear the Amazon Music full history on ViWizard. Don’t worry, this action will not delete your converted Amazon Music songs. You can open these Amazon Music files with the built-in media player and it usually won’t record and keep any listening history.
Part 5. How to Fix Amazon Music Song History Not Working
A lot of users give feedback that their song histories are gone. Here are some common troubleshooting steps you can try:
Fix 1. Update the Amazon Music App
Issues and bugs will still persist and continue to affect smooth listening if you use the outdated version of the Amazon Music app. Hence, use the following steps to grab the latest version of Amazon Music.
1. Open the app store where you installed Amazon Music on your device.
2. Enter Amazon Music on the search bar and open the app’s detail page.
3. If an update is available, hit on the Update option.

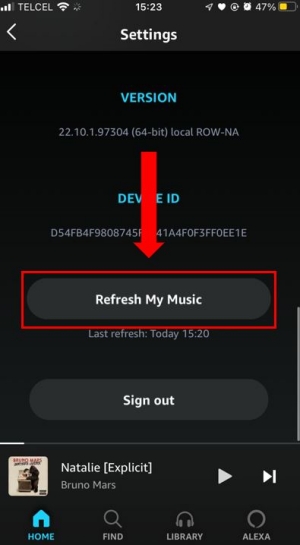
Fix 2. Refresh Your Amazon Music
If your music library hasn’t been loaded by the crashed Amazon Music app, then it will show any song on the Library section, let alone the song history and recently played playlists.
1. Navigate to Settings on Amazon Music.
2. Scroll down to select Refresh my Music or Reload Library.
Fix 3. Switch to the Website or Another Device
You can try to go to the mobile or desktop website as a temporary fix to see Amazon Music history. Or sometimes, this issue is caused by your current device. Then rebooting your current device or switching to another device can fix Amazon Music song history not working.
Fix 4. Reinstall the Amazon Music App
The most direct and effective way to solve most issues is to uninstall the problematic app and then reinstall it. On Android, long-press the Amazon Music icon on your home screen, and then select Uninstall to delete it from your Android device. On iOS, tap and hold the Amazon Music app and select the Remove the App option. After removing it, go to Google Play Store or App Store to install the Amazon Music app again.
Conclusion
It is so good a habit for private people to clear Amazon Music history regularly. That’s all about how to clear Amazon Music history in terms of listening, searching, and browsing. Hope this helps. If you want to organize and manage your listening and downloading history better, you can try to use Tunelf Amazon Music Converter. After conversion, it’s easy to delete all history without removing downloading songs and listen to them without producing history. Try it!
Get the product now:
Get the product now: